
I f you want to learn how to make a forum website on your blog or new domain, I'm here to help!
Online forums are a great way to develop a community and discuss relevant topics. They can also help you drive traffic to your blog, build your readership, and boost engagement. However, with so many community forum tools available, it might be difficult to choose the best one. That’s why I’ll recommend some great forum software and show you step-by-step how to make a forum website with them!
If you’re ready and want to skip ahead to the fun stuff – click here!
In This Guide:
Key Takeaways on How To Make a Forum Website
- Install the free bbPress plugin to add forums to your WordPress site easily.
- Set up a domain and web hosting like Bluehost before installing bbPress.
- Create new forums by adding titles and descriptions in the bbPress interface.
- Display forums on your site using the [bbp-forum-index] shortcode.
- Allow user registrations and add login/password recovery pages with bbPress shortcodes.
- Configure settings like post delays, user roles, templates, and RSS feeds.
- Assign roles like Keymaster, Moderator, Participant to manage forum access.
- Integrate MemberPress for paid membership options on your forums.
- Add WPForms for user surveys/polls and MonsterInsights for analytics tracking.
- Add plugins as needed to monetize, engage users, collect data, and scale your forums.
What Is a Forum Website?
A forum is an online discussion board where users can share their thoughts, content, media, questions, and more. It allows online communities to interact easily and share their ideas, usually on specific topics.
Here’s an example of a forum on a popular wedding blog called WeddingBee:
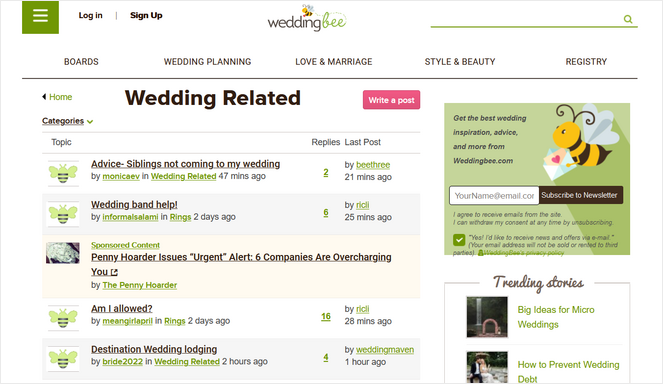
Users can ask questions about wedding-related issues and get helpful advice from other community members.
In another example, a health and food blog called The Blood Sugar Diet uses its forum to allow users to submit topics, questions, and feedback on topics like diet, exercise, and mindfulness.

You can create a forum on your blog about any topic you want to discuss with your readers. However, I recommend that your forum be related to your blog niche, as this will make it easier to attract your target audience.
Why Add a Community Forum to Your Blog?
Forums allow everyone to express themselves and connect with others who share their interests and pain points.
Building a community around your blog is important to develop a loyal readership that keeps coming back. Without a sense of belonging, many will turn to the next blog.
An active forum on your blog can help you stand out from the competition and keep users coming back.
Aside from building a community, here’s what else a forum can do for your blog:
- Improve SEO & Boost Traffic
Your public forums will be filled with keywords and fresh content, which can help you improve your search engine rankings and drive more organic traffic to your blog.
- Collect Feedback & Data
Start an online discussion about topics in your industry to get to know your target audience better. This will help you generate future blog post ideas and campaigns that are likely to convert.
- Boost Engagement
Because they’re centered around conversations, forums are the perfect way to boost engagement on your blog by up to 21%. You can use your discussion posts to answer questions, link to relevant blog content, promote products and services, build an email list, and much more.
Now that we know the benefits of adding a forum to your blog, here is a step-by-step tutorial to help you get started.
Before I start, though, let’s make sure you have everything you need.
What You Need to Create an Online Forum: Domain Name and Web Hosting
The easiest way to start a forum is with a WordPress website. If you already have a WordPress blog, skip this section and move on to the next.
If you don’t have a WordPress website yet, here’s what you’ll need:
- A domain name – A domain name is your website address URL, like www.example.com, that users type into their browser’s address bar to get to your site.
- A web hosting account – A web hosting account is where your website files are stored.
For a domain name and web hosting, I recommend Bluehost.

WordPress officially recommends Bluehost as one of the best blog hosting services on the market. It’s reliable, easy to set up, and you can install WordPress with one click.
The best part? Blog Tyrant readers get a special deal that includes a free domain name!
Exclusive offer for BlogTyrant readers
We have partnered up with Bluehost to get 60% off for our readers! You also get to register a FREE domain for a year which normally costs around $14.99 per year.
Claim this Exclusive Bluehost offerCheck out this tutorial if you need help installing WordPress on Bluehost.
Now that you have everything you need – let’s start creating a WordPress forum…
How to Create a Forum Website with bbPress (Step-by-Step)
For this step-by-step tutorial, I will show you how to create a forum for your website using bbPress.

bbPress is one of the best free forum plugins for WordPress. It’s simple to install the plugin with one click, easy to use and doesn’t require any coding knowledge, making it ideal for beginner bloggers.
bbPress aims for simplicity, so it has one unified admin area and deep integrations with WordPress and WordPress themes. It’s customizable, so you can design your forums however you’d like using its versatile, prebuilt templates.
And for those who are comfortable editing code, there’s also the option to customize and remove any code you want.
It also has a large library of paid and free add-ons, so you can add specific elements of a forum to your existing website.
bbPress also comes with full Akismet support to protect your site from spam. Plus, it uses bloat-free code, so it’s guaranteed to never slow down your blog or send visitors away.
Now that we know more about bbPress let’s look at how to add a forum to your website.
1. Install and Activate bbPress
First, you’ll need to install bbPress on your WordPress site.
If you need help, check out our guide on how to install a WordPress plugin.
Once you’ve installed and activated the plugin, you’ll see the welcome screen appear. You’ll also see the Forums, Topics, and Replies navigation links added to your WordPress admin panel.
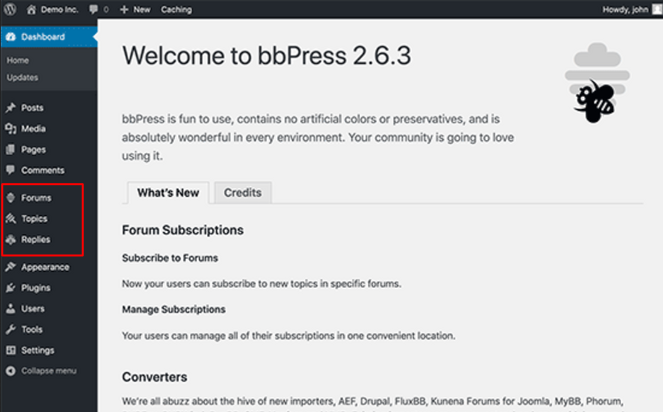
Now, you’re ready to create a forum on your site.
2. Add a New Forum
To create a new forum, click Forums » Add New from your WordPress side panel.
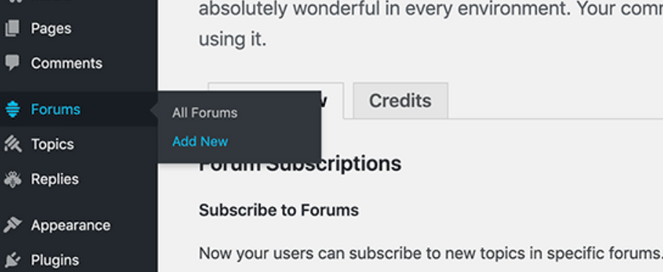
This will take you to a forum edit area similar to the WordPress post edit screen. Here, you can add a title and description to your forum.
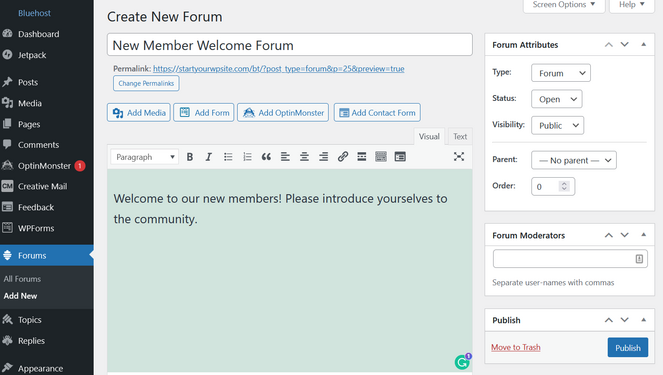
Once you hit Publish, you can move on to the next step. Repeat this step to create as many forums as you like.
3. Display Your bbPress Forum in the Front End of WordPress
Now that you’ve created your forum, you need to display it on the front end of your website so users can see it.
Create a new WordPress page by heading to Pages » Add New in the WordPress dashboard.
In the post edit screen, you can give your new page a title like “Forums” and paste this shortcode on the page: [bbp-forum-index]
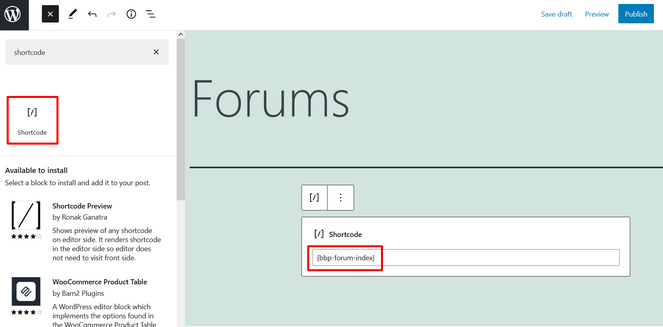
The shortcode is automatically added to a shortcode block. If you don’t see the shortcode block, add it using the (+) and then paste the code inside.
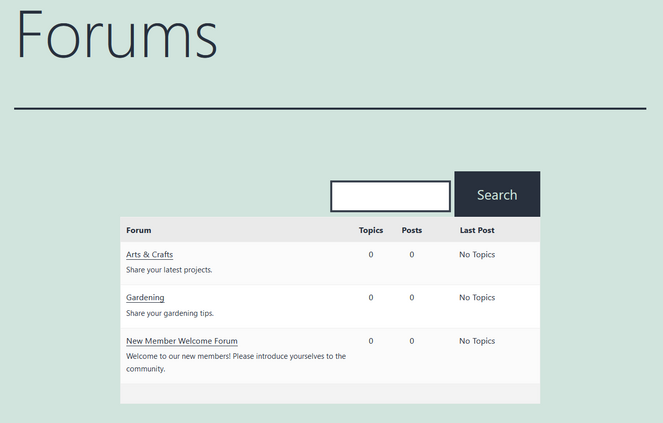
Once you click Publish, your forum is live on your website. Users can now add posts and forum threads according to your settings.
When you preview your online forum, it’ll look something like this:
Now, you need to help site visitors find your forum link so they can add to the conversation. To do that, you’re going to add the link for your forum to your website’s top navigation menu.
Click on Appearance » Menus to add the forum page to the navigation menu. Put a checkmark beside the Forums page and click Add to Menu:
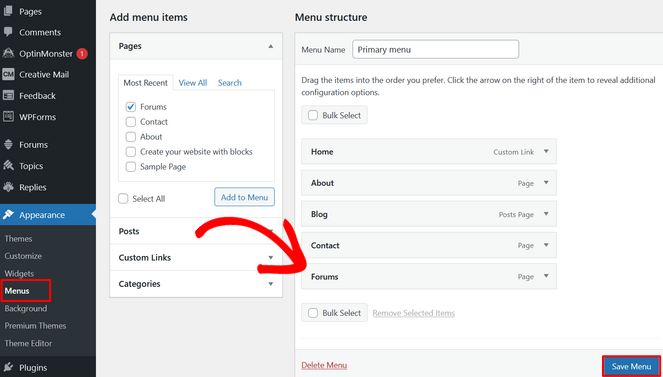
Once you click Save Menu, a link to your forum will now be visible in your navigation menu for easy access.
4. Add Important Forum Pages to Your Site
If you want to allow new users to participate in your forum online discussion, you’ll need to open your site for registrations.
To do this, go to Settings » General and check the box that says Anyone can register. This opens your forum to the public so anyone can leave comments and reply to other users.
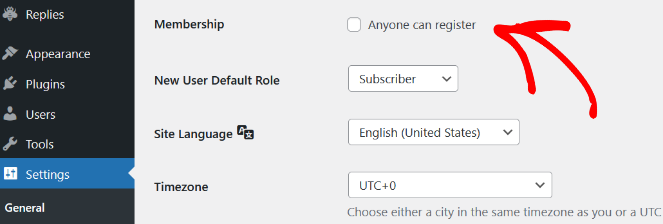
Save your changes.
Now that you’ve created a registration forum, you need to create a registration page.
To create a registration page, create a WordPress page and add a title like “Registration” or something similar. Then, add the following shortcode to the post: [bbp-register]
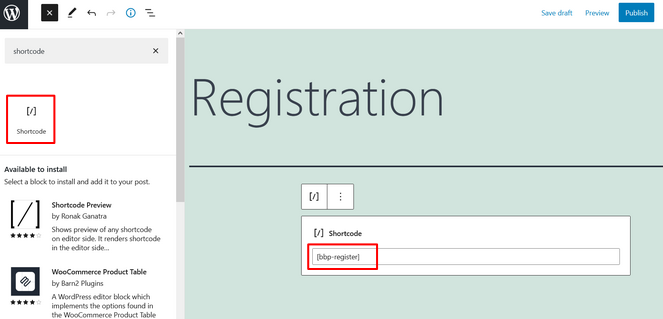
After that, click on the Publish button.
Now, you have a live registration form that will appear to users that aren’t logged in to your site.
You should also create a lost password recovery page so users can reset and recover their passwords.
To do so, create a new WordPress page called “Lost Password” and add this shortcode: [bbp-lost-pass]
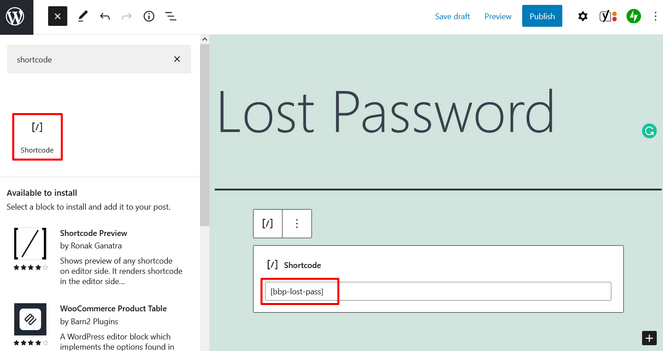
Hit Publish to make it live.
Lastly, you should create a login form so users can log in from anywhere on your site. Luckily, bbPress has a login widget that makes this easy to do.
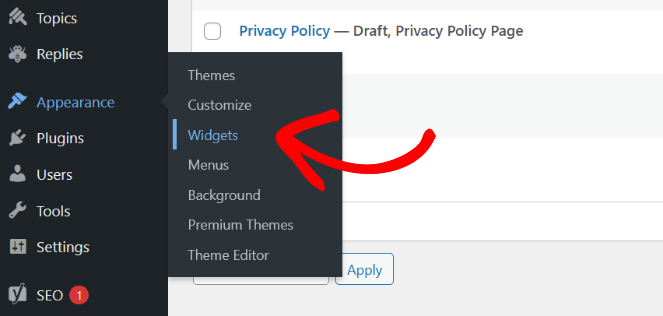
Go to Appearance » Widgets:
Click on the (+) Plus sign, then type Login in the search bar and select (bbPress) Login Widget:
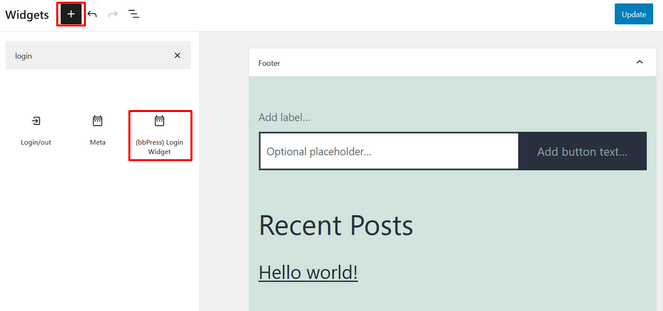
Once you select the widget, it will be automatically added to the widget-ready area of your website.
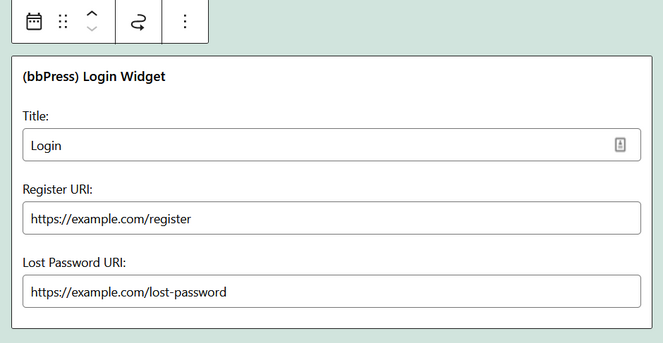
Next, add the information for your login widget. The fields provided are:
- Title – Choose a title for your login widget like “Login” or “Sign In.”
- Registration URL – Paste the URL of the registration page you just created.
- Lost Password URL – Paste the URL of the lost password page you just created.
After you’ve filled in the information, it should look something like this:
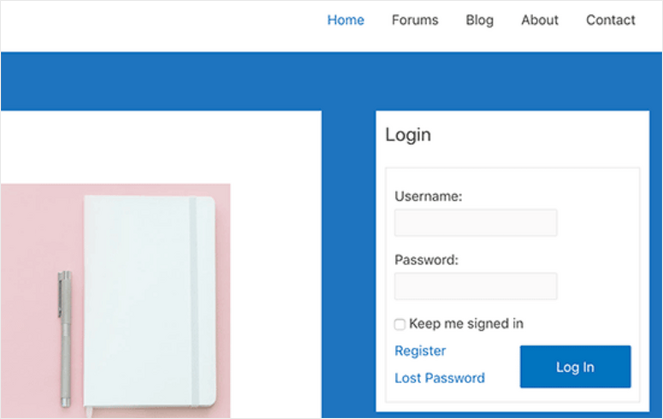
After saving your changes, you’ll see the login form where you placed the widget on your site. Users that are logged in will see their usernames and a logout link instead of empty form fields:
Your forum pages are now complete!
5. Configure bbPress Settings
Next, it’s important to look at your settings and make sure everything is configured according to your standards.
Configuring these settings will help you manage and moderate your forum easier.
Under Settings » Forums, you’ll find the settings for bbPress.
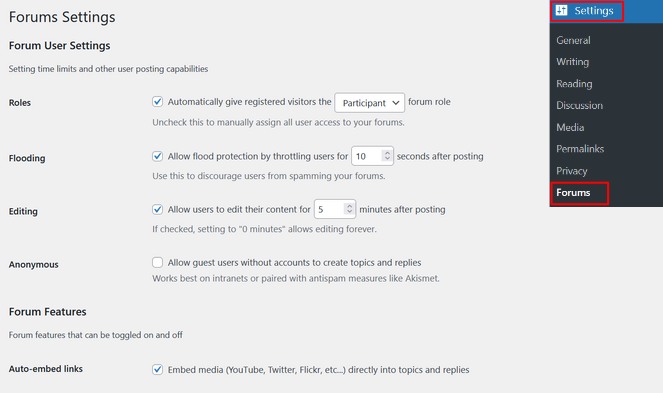
Here, you can manage how long you want to allow user edits, add a delay between posts to prevent spamming, allow anonymous submissions, and automatically assign registered visitors a role such as a Participant.
The default settings of the forum plugin work well with most forum websites if you aren’t sure what numbers to punch in.
Further down the page, you’ll see additional features you can turn on and off using checkboxes:
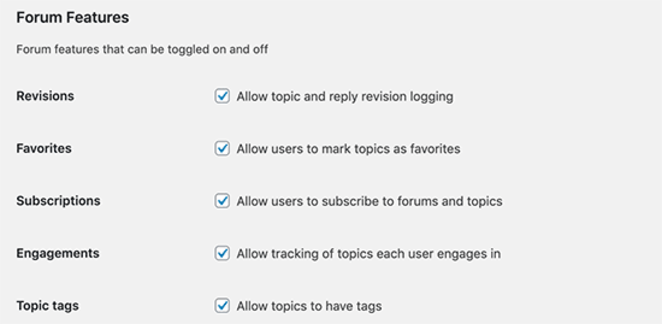
With these settings, you can allow or disallow users to mark topics as favorites, subscribe to forums and topics, and more.
Next, you’ll see forum display features:

You can choose a bbPress template, the number of topics and replies per page, and the number of topics and replies per RSS page.
Lastly, you can select URL slugs for different sections and forum pages. Slugs are the SEO-friendly URL names that WordPress uses to sort your content.

The default SEO tags generated by bbPress are good to use, but you can change them.
Click Save Changes, and you’re all done with your settings.
6. Add Forum User Roles in bbPress
Lastly, once your forum is set up, you might need to assign different roles to users.
For example, you can grant more permissions to certain users or team members so that they can help you moderate the forum.
You may even need to block users who violate forum rules.
When you want to add a new user or edit an existing user’s profile, you have 5 roles to choose from:
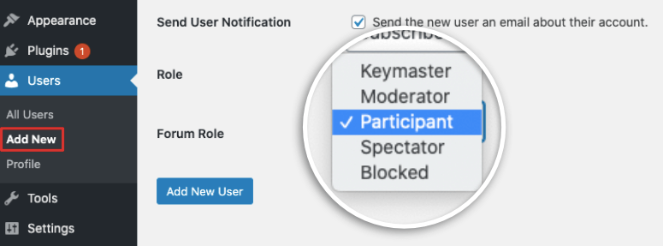
- Keymaster – This role is automatically assigned to the website owner. The Keymaster can create and delete forums, create topics, and posts.
- Moderator – These users have access to capabilities that allow them to moderate forums, topics, and posts.
- Participant – This is the default user role for bbPress. Participants can create and edit topics and posts, favorite and subscribe to topics, and more.
- Spectator – Spectators have read-only access to public forums, topics, and posts.
- Blocked – Blocked users have all of their capabilities removed. They can still read public topics and posts, but they won’t be able to participate in the forums.
By assigning user roles, you can make sure your forum runs smoothly at all times.
Plugins to Grow and Promote Your Forum
To get the most out of your online forum, you can integrate it with other tools and plugins to help you make money from your content, attract more people to your site, get to know your readers, and more.
Let’s check out a few powerful plugins you can use to take your forum to the next level.
1. MemberPress
MemberPress is the best membership plugin for WordPress. In just a few clicks, you can turn your WordPress site into an exclusive membership site and start making money from your forums.
When you integrate bbPress with MemberPress, you can add subscription layers to your site. This allows you to charge a monthly fee to users that want to access your forums or other premium content.
MemberPress comes with powerful features like custom access rules for full control over who accesses your content, coupons, dynamic pricing pages, the ability to create and sell online courses, and much more.
If you want to learn how to create a membership site – don’t miss our guide for step-by-step instructions!
2. WPForms
WPForms is the best contact form plugin for WordPress. It allows you to create optimized, user-friendly forms to collect visitors’ information. It comes with advanced form functionality, including a drag-and-drop builder and tons of templates that make it easy to create online forms in just minutes.
It’s important to collect user feedback and data to ensure that you give visitors the best experience while on your site. Gathering their information and opinions on your discussion forums helps you understand your audience better so you can continue creating relevant content that converts.
With WPForms, you can add polls and surveys to your bbPress forum to learn more about your community and boost engagement.
You can also use WPForms to create contact forms, registration forms, payment forms, and much more.
3. MonsterInsights

With MonsterInsights, it’s easy to understand the details behind your website’s performance.
MonsterInsights is super easy to install and set up on your WordPress site. It gives you a comprehensive overview of your site analytics and also lets you build custom reports to track specific goals. Some of these include publisher reports, eCommerce reports, real-time reports, audience demographic reports, search console reports, and more.
If you add contact forms to your discussion boards with WPForms, you can monitor them using MonsterInsights’ Forms tracking addon. This addon automatically tracks all your WordPress forms, including contact forms, registration forms, and survey forms, so you stay on top of your data.
It’s crucial to take advantage of bbPress’s useful integrations to steer more readers to your blog and grow your brand to its fullest potential.
Create a Community Forum For Your WordPress Site Today!
There you have it.
I hope you enjoyed this step-by-step tutorial on how to add a forum to your blog with bbPress.
If you want similar content, be sure to check out our post on how to create a quiz in WordPress.
And while you’re here, don’t forget to subscribe to our newsletter for more blogging tips sent straight to your inbox!


Thanks for sharing this post very infromative.
Thank you for this blog
Big thanks for this guide! Two issues I ran into:
1) I think that ‘Forums’ is a keyword – anytime I try to create a WordPress page with Forums as the title, I just get a blank screen when I preview or publish it.
2) The shortcut uses one set of brackets, not two; [bbp-forum-index], not [[bbp-forum-index]].