
A re you planning to start an online store? Whether you want to sell a single product or create a full-fledge eCommerce store, you're in the right place.
With more and more people shopping online in recent years, NOW is the best time to start a business so you can make money online.
But what if you lack technical knowledge?
Don’t worry! I’ll walk you through the step-by-step process of starting an online store from scratch without any hassle.
Let’s get started!
In This Guide:
Key Takeaways For How To Start an Online Store
For readers in a rush, here are the key takeaways from this guide on how to start an online store using WordPress!
- Choose WooCommerce over Shopify for a flexible, customizable, and cost-effective eCommerce platform ideal for beginners.
- Get a domain name and web hosting, like the affordable and WordPress-recommended Bluehost.
- Follow the step-by-step process to set up WooCommerce, add products, customize the theme, and install essential plugins for forms, analytics, security, and SEO.
- While some investment is required, learn how to start an online store with little money, without inventory, and address legal considerations.
- Build a smooth, interactive website with great features to provide an excellent shopping experience for customers.
- Check out additional resources on increasing traffic, making money online, and speeding up your website.
How To Start An Online Store in 7 Easy Steps
eCommerce has become one of the most sought-after businesses in recent years.
With millions of online shoppers on the internet, starting an online store can make you tons of money if done right.
In this step-by-step guide, we’ll teach you how to launch your eCommerce website and scale your business towards profitability.
Let’s dive in:
1. Choosing The Right eCommerce Platform
Before starting, the first thing you need to choose is a platform for your online store. When making this decision, a few things to consider are features, ease of use, pricing, and user-friendliness.
Currently, WooCommerce and Shopify are the two most popular eCommerce platforms on the market. But which one should you use to build an online store?
I know it can be a bit overwhelming to choose the right platform for your needs.
That’s why, I completed the hard part for you and built a short comparison of both platforms. Let’s take a look at both of them:
WooCommerce
WooCommerce is the most popular eCommerce platform on the web. You can customize it as per your needs and launch a small or full-scale eCommerce store with ease.
WooCommerce is an open-source platform and it’s available as a free plugin in the repository. So all you need is a domain name and a web hosting account to get started.
Some of the important features of WooCommerce are:
- Add unlimited products to your online shop along with product images
- Allows target audience to sort and filter products based on different parameters
- Easily add reviews and ratings on the product page
- Sell physical, digital, or both types of products without any hassle
- Accept payments via Stripe, PayPal, and other popular providers
Apart from the above, you can also add extra features to your WooCommerce store with the help of hundreds of free and paid extensions.
The only drawback of this platform is you’ll have to control everything including backups, security, and SEO. However, you can easily solve or automate most of these processes by using WordPress plugins.
Overall, WooCommerce is a highly feature-rich eCommerce platform and can be recommended to most beginner or advanced users to start a successful online store for free.
Get Started with WooCommerce Today!Shopify

Shopify is a popular fully-hosted eCommerce platform and online store builder.
With Shopify, you don’t need to install any software or manage anything on the technical side like WooCommerce.
It allows you to easily start an online business within minutes. You can also customize your store with the help of a drag-and-drop website builder.
To start, you can either use your existing domain or purchase a new one through Shopify.
Let’s take a look at some of the best features of Shopify:
- User-friendly
- Comes with 70+ built-in fully responsive themes
- Offers secure and mobile-friendly checkout system
- Can be integrated with over 2,500 apps to extend its functionality
- Offers a free tool to easily create logos for your business
- Get started with a 14-day free trial
The biggest disadvantage of Shopify is its price. The basic plans start from $25 per month, which can be difficult to afford for online store owners on a budget.
Also, it comes with limited customizability and features when compared to WooCommerce. Plus, you don’t have full control over your store as it’s hosted on the Shopify server.
Fortunately, the platform provides a 14-day free trial to test it out before making a purchase decision.
Get Started with Shopify!Which eCommerce Platform Should You Use?
After comparing both platforms, I recommend using WooCommerce to start your first online store.
It offers all the essential features required for managing an eCommerce business. And you can always add extra features with the help of extensions.
Unlike Shopify, the WooCommerce and WordPress combo gives you total control over your website.
And WordPress makes it easy to customize your site. You can even create forms, monitor your site traffic, add opt-in forms, and design stunning pages without any coding knowledge.
Finally, starting a WordPress site is cheaper compared to Shopify. All you need to purchase is a domain name and create an account on your chosen web hosting platform.
Now that you’ve selected the platform for your online store and have a business plan in hand, I’ll show you how to start an online store with WooCommerce and WordPress.
2. Getting Started
The next thing you need to set up an online store is a domain name and a web hosting account.
Why do you need them?
Well, a domain name is the address of a website. It’s what you write in the address bar of your web browser to open a site.

Some examples of a domain name are blogtryant.com, google.com, wpbeginner.com, etc.
On the other hand, a web host is a place where your website files are located.
When someone enters your domain name in their web browser, the website files of your online store will be fetched from your hosting account, and then it’ll be displayed to the visitor.
Now, there are many domain and web hosting companies out there. Most of them will charge you around $14.99 per year for a single domain name and $7.99 per month for a web hosting account.
As you can expect, this will prove costly for a lot of people.
That’s why we recommend using Bluehost for starting your online store today.
We’ve partnered with Bluehost to get 60% OFF for our readers! You can purchase their WooCommerce-optimized hosting service at $7.45 per month and you’ll also get a domain name of your choice for free. Isn’t that great?
Get Started with bluehost todayBluehost is also one of the few officially recommended web hosting services by WordPress.
Plus, you’ll get a free SSL certificate, free domain, 100 GB SSD storage, domain privacy protection, business email service, and a dedicated IP address with every plan.
So without further ado, let me show you the step-by-step process on how to start an online store on Bluehost.
How To Setup An Online Store Using Bluehost
1. First, you need to head over to the Bluehost website.
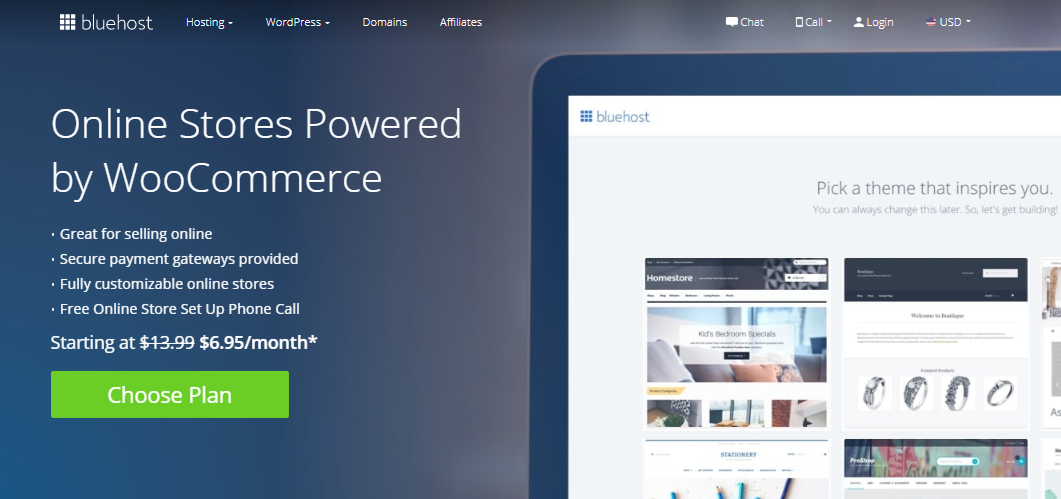
We’ll be using the Bluehost web hosting service that’s powered by WooCommerce and not the shared one.
This particular WordPress hosting service is much faster and specifically optimized for eCommerce stores.
2. On the Bluehost homepage, click on the Choose Plan button to get started. You will be redirected to the pricing plan section.
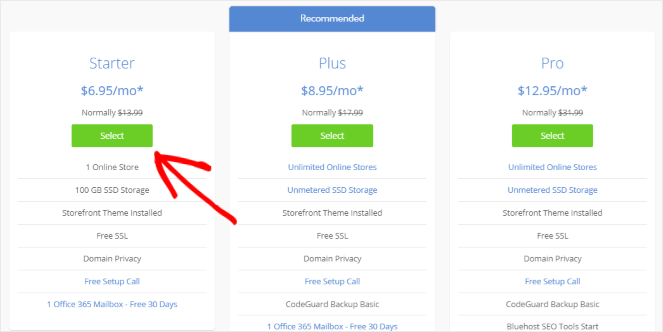
We recommend choosing the Starter plan for most small businesses and solopreneurs.
However, if you want to start more than one online store, choose the Plus or Pro plan.
Decide which plan you want to buy and click on the Select button to proceed.
3. On the next page, you’ll be asked to register a free domain for your business.
Remember to select a brandable and easy-to-remember domain name for your online store. You can check out this guide on how to choose a domain name to make your decision easier.
In most cases, you should use your store name as your domain name if it’s available. You can also use Nameboy to search the availability of a domain name.
4. Once you’ve decided a domain name, enter it in the textbox under the Create a new domain section. Also, make sure to select your preferred domain extension and click on Next.
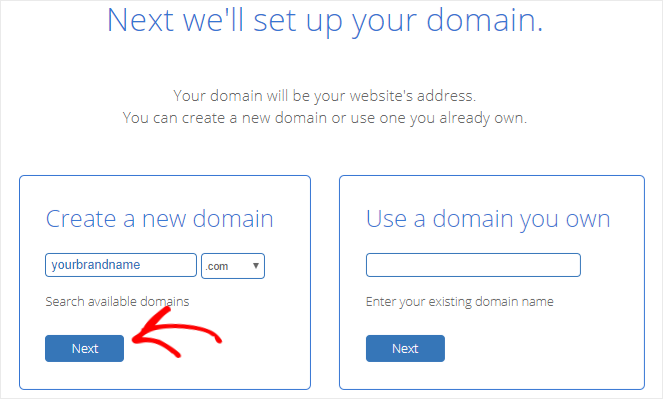
5. If your domain name is available, you’ll be redirected to the next page where Bluehost will ask for some details to complete the process.
Under Account Information, enter your personal details like name, address, email address, phone number, and business name (if any).
6. After these steps, you’ll be prompted to select an account plan that you would like to use.
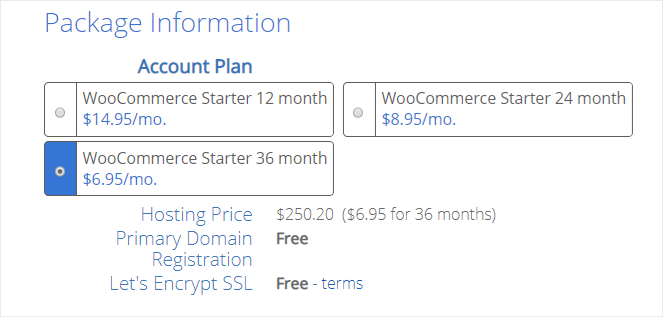
Bluehost will also let you purchase extra features under the Package Extra section. At this point, uncheck all the boxes to avoid any unnecessary expenses—you can always come back later to buy add-ons.
7. Finally, enter your payment details, click on the Terms of Service checkbox, and click on the Submit button to complete the process.
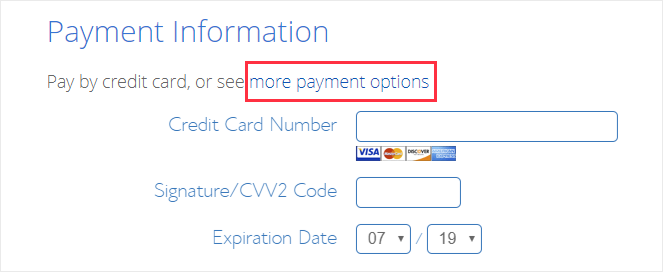
If you want to pay using PayPal, click on more payment options to use that payment method.
Congratulations! You’ve successfully registered a domain name for your online store and purchased a WooCommerce-optimized web hosting account.
You’ll now receive an email from Bluehost with all the account details including the cPanel (Control Panel) login credentials.
Once you’ve got the credentials, go ahead and log in to your Bluehost cPanel.
On the cPanel dashboard, you’ll see a popup with the success message that WordPress and WooCommerce are pre-installed on your website.
Great! Let’s move on to the next step of the process and make some essential changes to our newly created WordPress site.
3. Setting Up Your WordPress Site
Once your website is live, it’s time to make some basic changes to our website, such as changing the site name and tagline.
Security is another crucial part of your online store. For this, we’ll set up SSL so we can use HTTPS instead of HTTP. This will make your site more secure for accepting payments online.
1. Log in to your WordPress dashboard using the login details present in your Bluehost welcome email.
2. Head over to Settings » General from the left sidebar of your WordPress admin panel.
3. On the General Settings page, change the website title and tagline of your new online store.
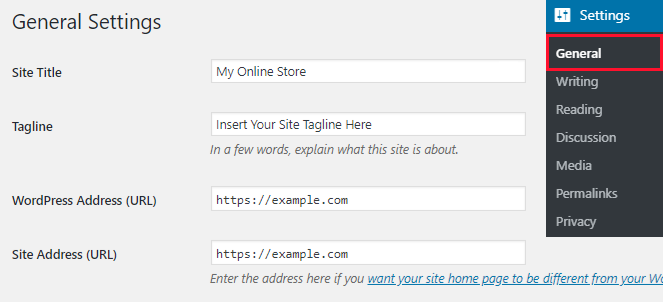
4. Next, change the WordPress Address (URL) and Site Address (URL) from HTTP to HTTPS.
Why? Well, Bluehost pre-installs SSL on your website. However, you need to change to HTTPS to finish the SSL configuration.
This will make your website secure for online payments, something which is mandatory for an eCommerce store.
5. Once done, scroll down to the bottom of the page and click on the Save Changes button to store the settings.
These changes are sufficient for the time being. However, you can make additional changes to your site by visiting other settings pages.
4. How To Start An Online Store With WooCommerce
Now, it’s time to set up WooCommerce on your website.
If you chose Bluehost, WooCommerce plugin will automatically be added at the time of installing WordPress on your website. You will also see a notification on your WordPress Dashboard asking you to run the configuration wizard.

1. To start building your store, you need to click on the Run the Setup Wizard button. This will open the configuration wizard on a new page.
2. Provide some basic details like the location of your store, address, and preferred currency. You’ll also have to select the type of product you want to sell. It can be digital, physical, or both.
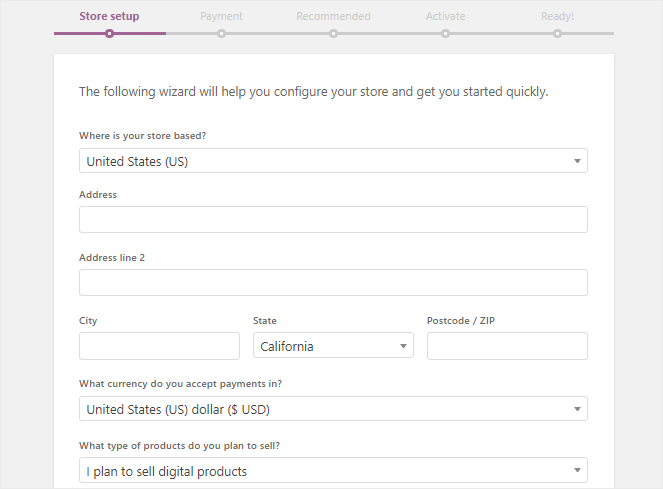
3. Once you’re done, you should click on the Let’s go! button, present at the bottom of the page, to proceed.
4. Next, WooCommerce will ask you to select some payment methods so your customers can checkout easily. You can enable online payment gateway options like Stripe and PayPal by clicking on the toggle boxes.
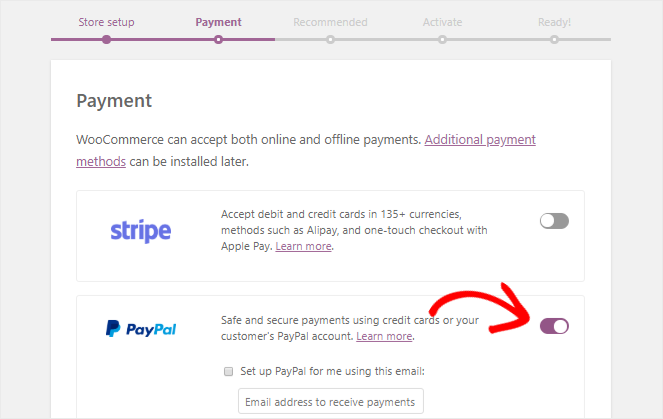
To add extra payment options, you can also install different WooCommerce extensions.
Want to accept offline payments? Just click on the arrow icon beside Offline Payments to view the different options available. Then, enable the ones you would like to use on your website.
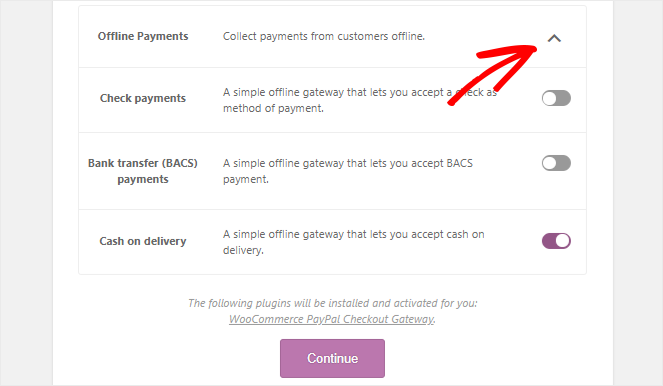
5. Once done, click on the Continue button to go to the next step. WooCommerce will now ask you to decide whether you want to charge for shipping your physical products or not.
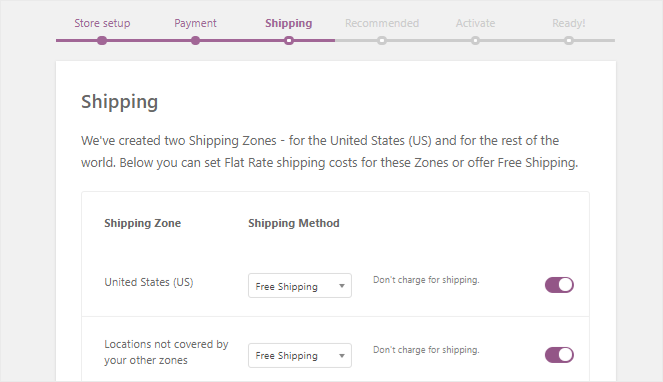
However, you’ll see this section only if you’re planning to sell physical products.
6. On the next step, WooCommerce will recommend you to install specific plugins on your WordPress site.
You can skip this part by going to the bottom of the page and then click on the Skip this step link. Don’t worry though—you can always install plugins later if you want.
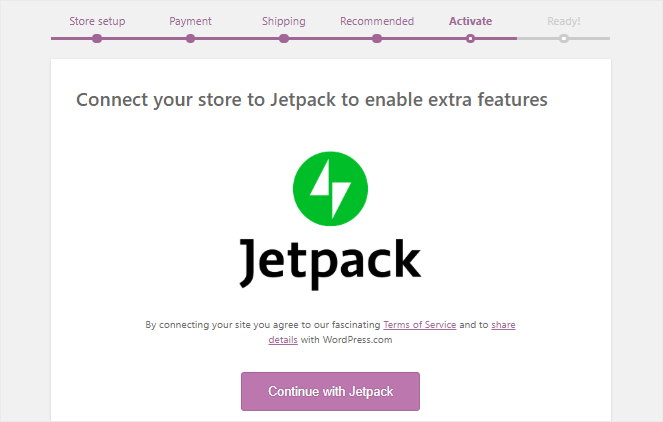
7. Next, you’ll be asked to install the Jetpack plugin. Again, it’s not essential to use Jetpack, so you can skip this step just like before.
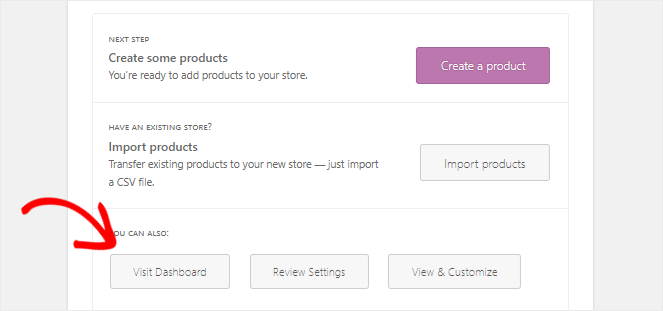
That’s all! You’ve completed the WooCommerce setup process. You can now click on the Visit Dashboard button to close this window.
5. Adding Products To Your Online Store
Once you’ve completed the basic configuration of WordPress and WooCommerce, you can start adding products to your store.
Let me show you how to do it so you can start selling online:
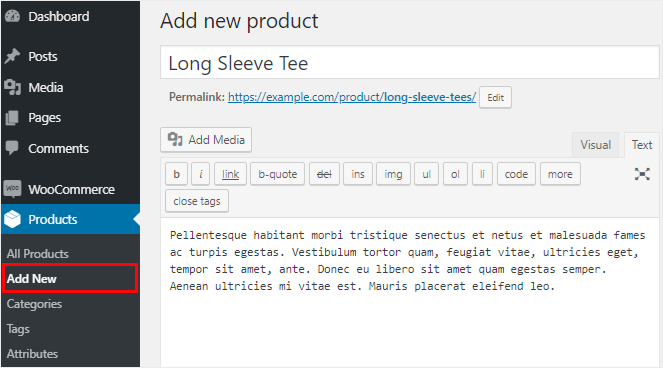
1. First, you need to go to Products » Add New from the left sidebar of your WordPress admin panel. This will open a new page where you can write the name and description of the product.
2. Next, scroll down to see the Product data box present below the page editor. This is where you can add details like price, inventory, shipping rates, and more for products to sell.
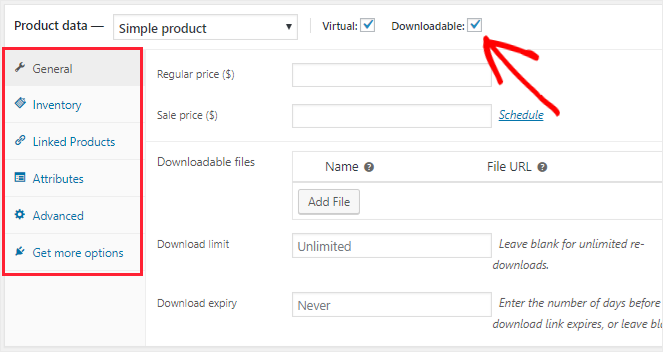
You can also specify if you’re selling virtual and downloadable items (products like coaching programs, graphic templates, etc.) by checking the boxes. This will open extra options where you can add the downloadable file, expiry date, and download limit.
On the right side of the page, you can add the main image of the product under the Product image box. You can also add extra images under the Product Gallery box.
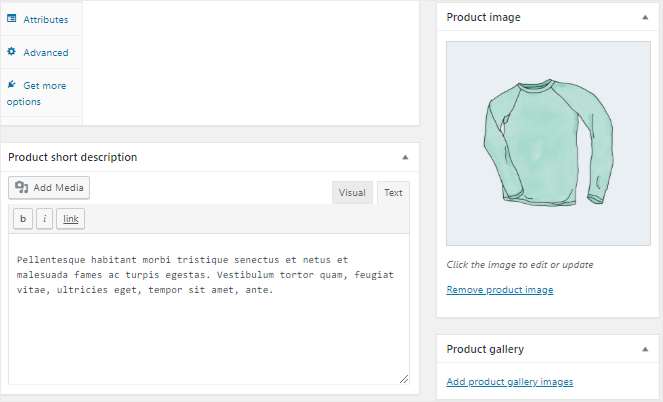
3. Finally, select the category of your product or leave it on default. Once done, click on the Publish button to make this product live.
You can follow the same process to add multiple products to your online store.
6. Customizing The Theme Of Your Online Store
WordPress themes control the way your website will appear to your visitors. And you can easily customize or change the theme if you want.
Bluehost automatically installs the Storefront theme when you set up an online store on WordPress. It’s a free eCommerce theme that works perfectly with WooCommerce.
To make changes to your theme, you need to go to Appearance » Customize from the left sidebar. This will open the WordPress Customizer, where you can easily design a store and see changes in real time.
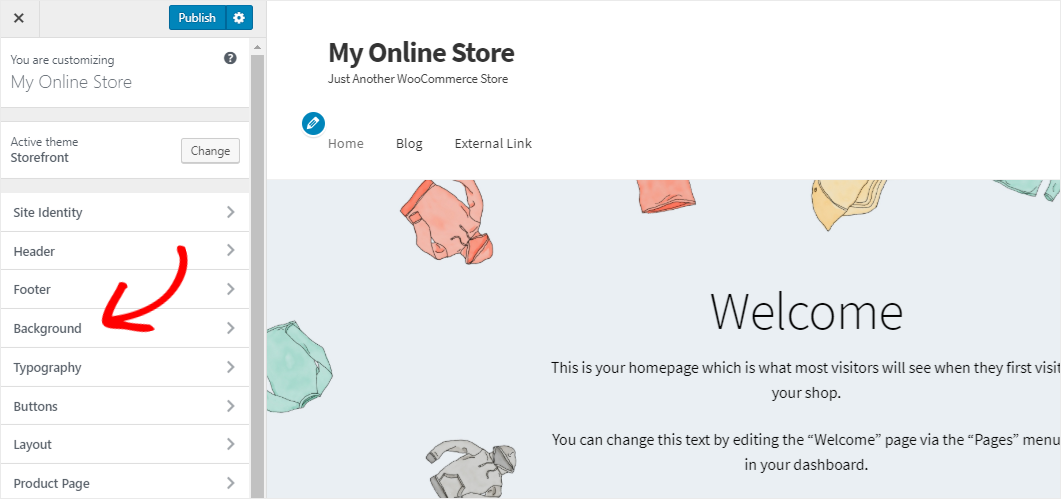
The left panel of the Theme Customizer allows you to make changes to the typography, colors, layout, header, footer, and more.
For example, you can change the background color by clicking on Background and selecting a color from the color selector. Similarly, you can change other settings based on your needs.
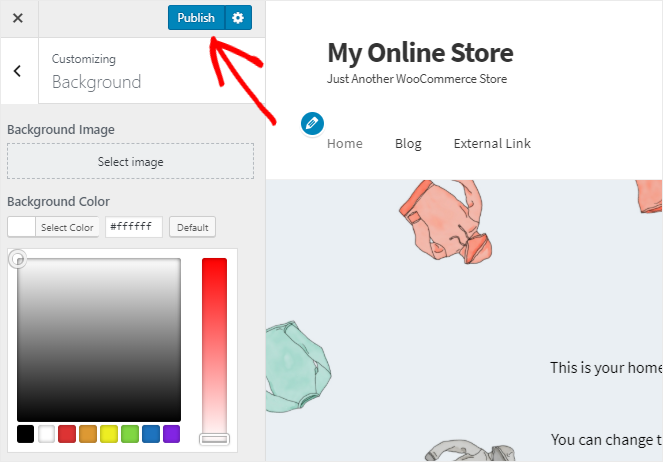
Once done, you need to click on the Publish button to save the changes.
You change your WordPress theme from a wide variety of third-party themes available on the internet. To make your job easier, here’s an expert roundup of the best WooCommerce WordPress themes.
7. Essential Plugins You Must Use
Although you’ve learned how to start an online store with WooCommerce and add products so far, there are still a couple things missing from your website.
For example, when you create an online store, you need to add a contact form so visitors can easily get in touch with you. You should also monitor the traffic on your website with the help of Google Analytics to properly grow your business.
This is where WordPress plugins come in handy. You can install a plugin to add extra features and take your site’s functionality to the next level.
However, there are more than 59,000 plugins available in the WordPress plugin repository. Which one should you use on your website?
While it’s recommended to install plugins relevant to your business, here’s a list of some essential plugins for online stores built on WordPress:
- WPForms: WPForms is the best form plugin for WordPress. You can use its drag-and-drop interface to build different types of forms including contact forms, survey forms, and feedback forms.
- OptinMonster: Planning to build an email list? You should use OptinMonster in that case. It’s a powerful lead generation software for marketers, eCommerce sites, and any new business.
- MonsterInsights: MonsterInsights is the best Google Analytics plugin for WordPress to help you monitor your site’s traffic from your admin panel and increase your online presence.
- SeedProd: If you don’t know code but want to design immersive landing pages, SeedProd is the plugin for you. You can use its drag-and-drop page builder to build high-quality landing pages within minutes. Plus, SeedProd offers WooCommerce blocks that you can add to any landing page to display popular products, discounted products, and much more.
- Duplicator: You should always back up the files, images, and other resources of your website even if your web host is doing that for you. And Duplicator is one of the best plugins you can use for this purpose.
- Sucuri: Sucuri is a popular WordPress security plugin that helps protect your site from hackers, malware, and DDoS attacks. It also provides CDN service to improve the loading time of your website.
- All in One SEO: AIOSEO is the most popular SEO plugin for WordPress. You can use it to optimize your site for search engines and get more traffic to your store.
- TrustPulse: Did you know that adding social proof can increase your site conversions by up to 15%? TrustPulse is a social proof notifications app that helps you promote your online store on popular social media platforms.
- Smash Balloon: With Instagram Feed Pro from Smash Balloon, you can easily embed Instagram feeds on your site. You can display hashtag feeds of user-generated content, showcase “shoppable” Instagram posts, and more.
If you’re looking for more cool plugins for inventory management and other tasks related to your WordPress eCommerce site, check out our expert roundup of the best WordPress plugins you must install on your website.
Also, check out these 20+ free plugins for WooCommerce to enhance and build a profitable online store.
How to Start an Online Store: FAQs
We’re nearly at the end of our guide. But before wrapping up, I’d like to address some common questions that a lot of business owner have when starting their first website:
How to start an online store with no money?
Unfortunately, when it comes to opening an online store, you have to spend money to make money. Some platforms, like Shopify, offer free trials so you can get started for free. But once your trial is up, you’ll have to start paying a subscription fee of $25 monthly.
If you want to minimize the cost of starting an online store, use WooCommerce. It’s completely free of cost and all you need to pay for is web hosting and a domain name.
With Bluehost, you can get started for just $7.45 per month AND get a free domain, which is also as close to free as you’ll find.
How to start an online store without inventory?
There are plenty of ways to open and manage your online store without handling the inventory yourself, such as print-on-demand services and dropshipping business.
Spocket, for example, is a dropshipping marketplace where you can choose from thousands of products you plan to sell on your site. They handle order fulfillment, shipping, and tracking for you.
For more information, check out this guide to dropshipping with WordPress.
How to start an online store legally?
When building your online store, it’s smart to be aware of any potential legal issues so you don’t get into expensive legal trouble.
I can’t offer legal advice here and definitely recommend talking to a lawyer for legal advice, since every situation is different.
In general, here are some legal concerns to be aware of when starting an online store:
- Privacy: When you’re handling sensitive data like credit card numbers, you need to make sure you’re doing it safely. That’s why using SSL and a reliable payment gateway is so important.
- Trademarks: Make sure your store name and logo aren’t violating someone else’s trademark. Consider registering your own store’s trademarks.
- Spam: You’ll want to read up on spam laws in your area, such as the CAN-SPAM act in the United States. You can find out more info in our guide to email marketing.
- Taxes: Talk to an accountant to find out what kind of taxes you can expect to pay, so you’re not stuck with a surprise bill at the end of the year.
That’s all! I hope this step-by-step tutorial helped you learn how to start an online store.
While the basic setup you choose for your store depends on your business, it’s crucial to build a smooth and interactive website that provides a great shopping experience to your customers.
If you liked this article, then you may also want to check out the best SEO tools to increase your traffic.
Also, please feel free to comment below if you have any questions.


Important information for setup online store.
Glad you found it helpful, Gautam!
It is a great post. I just wanted to say that I have really enjoyed reading your blog posts.
This is an amazing massive guide that covers everything that is needed. Thanks for sharing this! There are many platforms one can use to create an online store easily and quickly such as – shopify.com, valueappz.com, wix.com, and so on.
Soo that’s 250$ it’s all you need to spend for 3 years of online store running? Plus domein every year yes?