A re you looking to start a blog with the most popular blogging platform in the world? Then you need to know how to install WordPress!
Not only is WordPress.org the best blogging platform, it’s also completely free to use.
But to create a blog, you need to install WordPress on your own web hosting and domain (such as www.example.com).
Lucky for you, this step-by-step guide will help you through the entire process of choosing your blog niche, web hosting, and domain name so you can start your WordPress blog within minutes!
There’s no need to be a tech expert or coder—this guide is simple enough for complete beginners.
Ready? Let’s get started.
If you already know where you’re installing WordPress, you can use this table of contents to skip ahead:
In This Guide:
- How To Install WordPress On Bluehost
- How To Install WordPress On HostGator
- How To Install WordPress On SiteGround
- How To Install WordPress On WP Engine
- How To Install WordPress On Namecheap
- How To Install WordPress From cPanel
- How To Install WordPress Using Softaculous
- How To Install WordPress Using QuickInstall
- How To Install WordPress Using Fantastico
- How To Install WordPress Using FTP
- How To Install WordPress Locally On Your Computer
Key Takeaways: How To Install WordPress
- For the easiest WordPress installation, use Bluehost web hosting – WordPress comes pre-installed with a few clicks when you sign up.
- If not using Bluehost, look for a web host that offers 1-click WordPress installation through their control panel (cPanel). Popular options include SiteGround, HostGator, and WP Engine.
- For those more technically inclined, you can download WordPress and install it manually using an FTP program, but this is more complicated, especially for beginners.
- Have these details ready before installing: your domain name, a site name/description, admin username & password, and an email address to receive login credentials.
- Take advantage of auto-installers like Softaculous, QuickInstall, or Fantastico if your web host provides them – they walk you through the WordPress setup.
- Install WordPress in the root directory if you want yourdomain.com, or a subdirectory if you want yourdomain.com/blog.
- After installation, log into your WordPress site at yourdomain.com/wp-admin using the credentials you set up.
Where Should I Install WordPress?
Are you starting a new website or blog but unsure about which web hosting to get?
Bluehost offers the most straightforward and stress-free WordPress installation from all other web hosting providers. In fact, the platform will automatically install WordPress on your website when you sign up.
- Fast Load Time (Average of 461 milliseconds)
- WordPress is Pre-Installed
- Quick and Competent Support
- 30 Day Money Back Guarantee
For more options, you can see our guide to the best web hosting for bloggers.
To learn how to install WordPress on Bluehost and other platforms in more detail, keep reading!
How To Install WordPress On Bluehost
Installing WordPress is probably easiest when you have Bluehost. Why? Because Bluehost automatically installs WordPress on your domain when you sign up.
Bluehost is also officially recommended by WordPress and is the largest web hosting company in the world. Even if you accidentally skipped the installation process, Bluehost still offers 1-click WordPress installation.
Here’s how it works…
First, you’ll need to set up your Bluehost account. Then, you’ll be able to log in to your account using the credentials sent to your email address.
After you’ve logged in, go to the My Sites tab. Then, click on the Create Site button on the right.
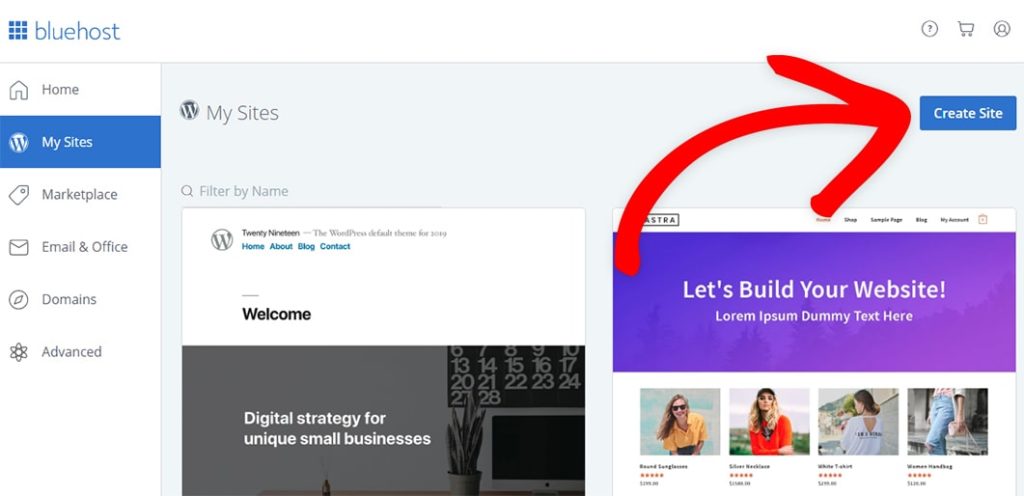
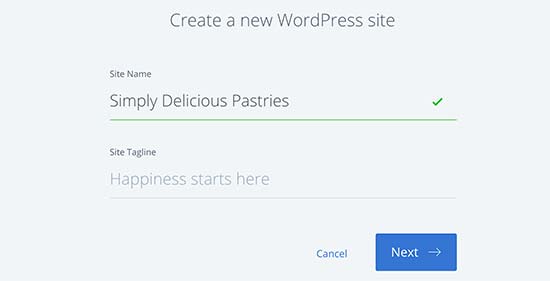
This will launch the Bluehost WordPress installation wizard. Here, you’ll need to add your site title and tagline (optional), and then click the Next button.
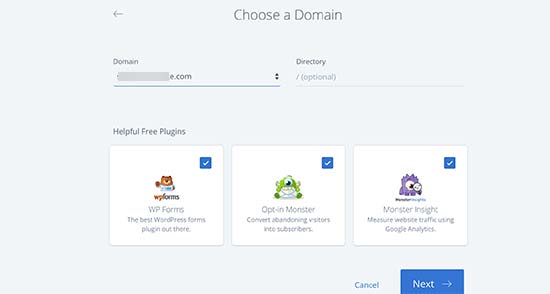
Now, you can select the domain where you want to install WordPress. (Note: If you haven’t set up a domain yet, you can get it from the Domains tab in your Bluehost dashboard.)
Click on the Next button to start the installation. After a few moments, you’ll see the success message with your site’s details. You’ll also get an email with the same details.
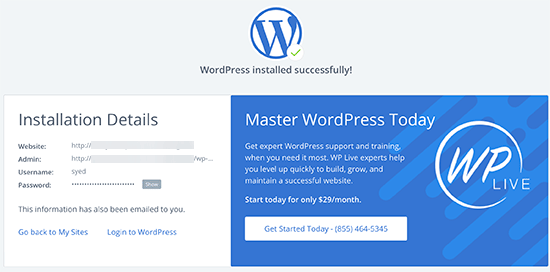
Now that that’s done, you can click on the Login to WordPress link to enter the admin area and the WordPress dashboard of your WordPress website.
That’s it, you’re done! You have successfully installed WordPress on Bluehost.
How To Install WordPress On HostGator
HostGator also provides a quick and seamless WordPress installation experience. Just follow the steps below to install WordPress on HostGator.
After you sign up for HostGator, log in to your account. From the dashboard, click QuickInstall under the Software section.
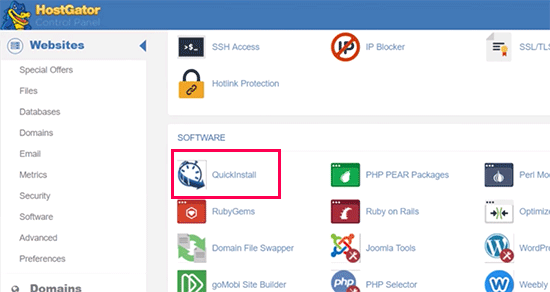
After you’ve clicked on QuickInstall, you’ll be taken to the next screen. Here, click on WordPress to launch the installation wizard.
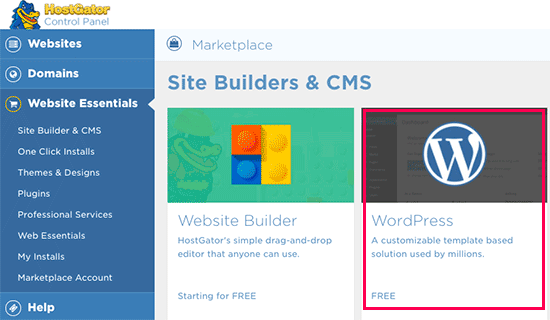
You’ll be asked to select a domain name where you want to install WordPress. You can leave the directory field blank. Click on the Next button to continue.
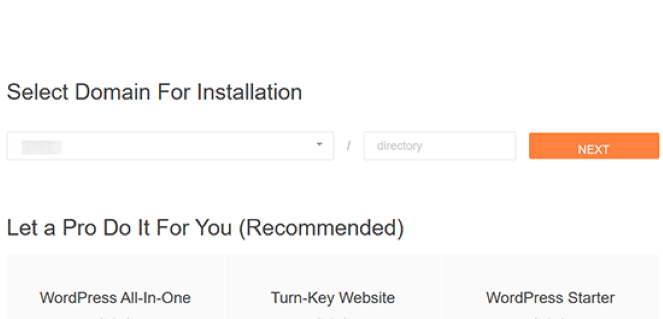
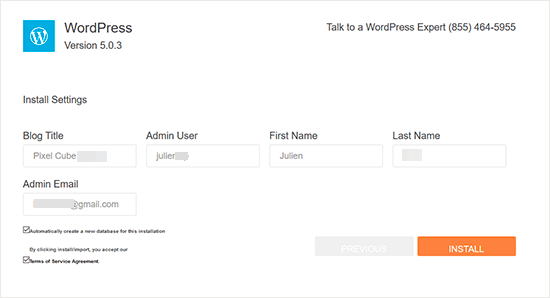
On the next screen, enter your site details such as site title, admin username, first and last name, and an email address to which you have access. Once you’ve entered these details, click on Install to start the installation.
Once the installation is completed, you’ll get a success message with your username and password. These details will also be emailed to you. Make sure you save your credentials somewhere safe so you’re able to login in the future.
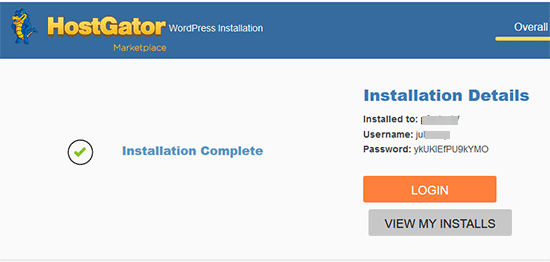
Congratulations, you have now successfully installed WordPress on HostGator.
How To Install WordPress On SiteGround
SiteGround is known for its affordable starter plans and awesome support. They’re very popular among new site owners who are creating their first blogs.
Installing WordPress with SiteGround is just as easy and the entire process can be completed from their dashboard.
For New SiteGround Users
If you’re a new SiteGround user, follow the steps below to install WordPress.
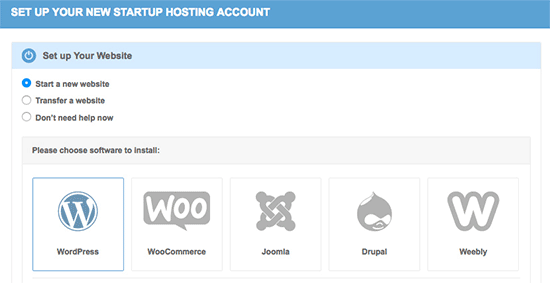
When you log in for the first time after signing up to a new SiteGround account, you’ll be greeted with a welcome popup asking you to set up your website. Select Start a new website and then select WordPress.
You’ll be asked to enter your site details like email address, username, and password. Add these details and then click on Confirm to continue.
On the next screen, you’ll be asked to review the details you added before. The installation wizard will also allow you to make any enhancements here. At this stage, we suggest you skip this option.
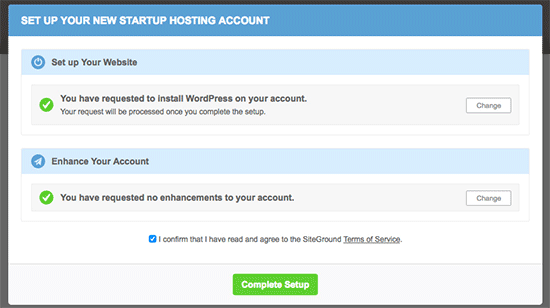
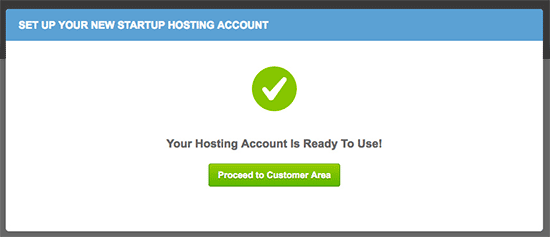
Once you’re done, click on Complete Setup to start the installation. After it’s complete, you’ll see a success message. Click on Proceed to the customer area.
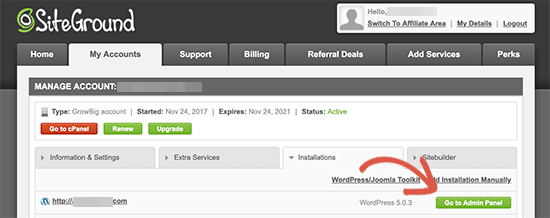
Then, go to the My Accounts tab and click on Go to Admin Panel to go to your admin area.
That’s it, you’ve now successfully installed WordPress on SiteGround as a new user!
For Existing SiteGround Users
If you’re an existing SiteGround user, follow the steps below to install WordPress.
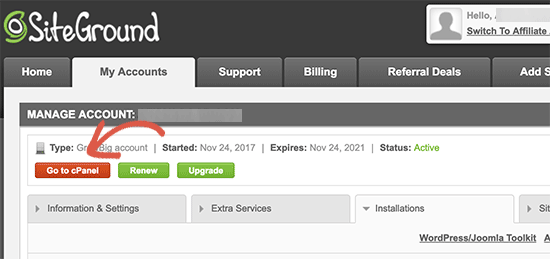
First, you need to log in to your SiteGround hosting account. Once logged in, you’ll have to go under the Accounts tab and click on cPanel.
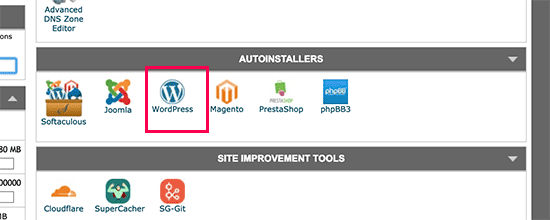
Once you’re there, scroll down to Auto Installers and then select WordPress.
This will launch the Auto installer. Click on Install and then select your protocol (http or https). If you don’t have SSL enabled on your domain name, select http. Remember to switch to https after the installation is complete.
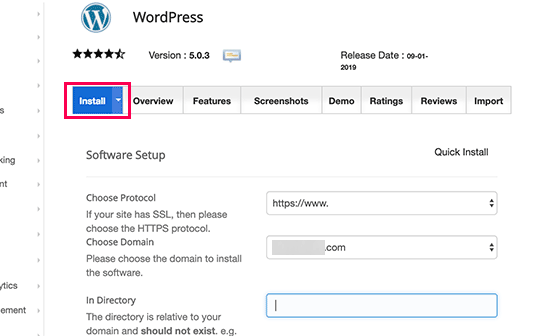
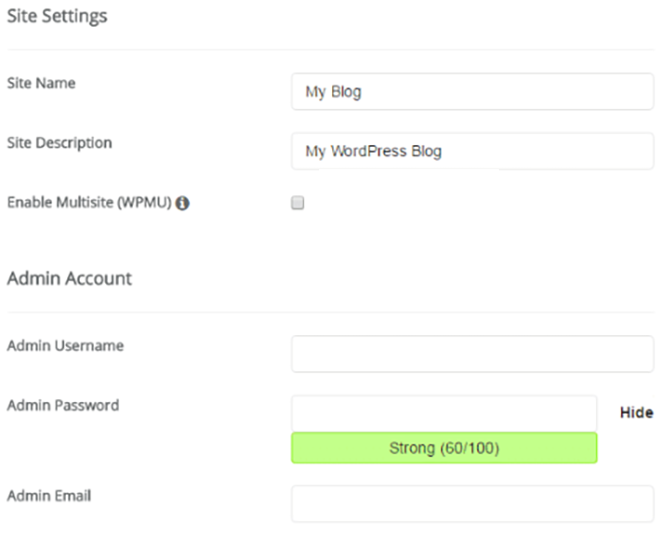
Next, enter your site details like title, username, password, and email address. Once you’ve entered your credentials, move on to the next step.
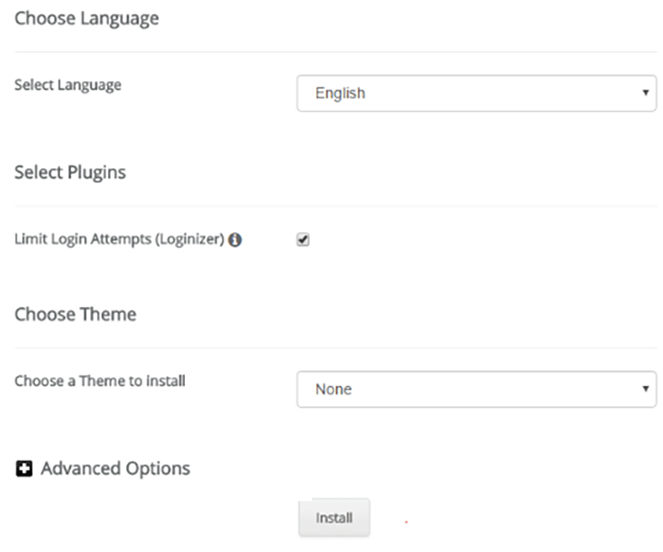
On this next screen, you’ll be presented with the option to select a language, install plugins, and do other things. If you’re familiar with them, select the ones you recognize or leave everything unchecked and move on.
Make sure to check the WordPress Starter option as it will guide you during the post-installation process. Once done, click on Install.
After the installation is finished, you’ll get an email with your website address and the login URL.
In order to log in, all you need to do is enter the login URL in your web browser and you’ll be redirected to your WordPress login page.
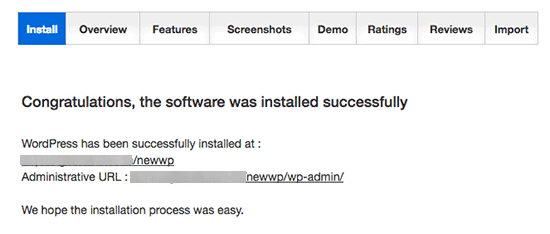
That’s it, you’re done with the installation! Next, you’ll be guided by SiteGround’s WordPress site setup wizard.
This will help you install a theme, install plugins, and other essential settings. You can even switch your site to an online store at this stage.
How To Install WordPress On WP Engine
WP Engine is a managed hosting service for WordPress. In simple words, this means WP Engine will take care of updates, installations, and your site’s performance—all you need to worry about is growing your blog/business.
WP Engine automatically installs WordPress with a few clicks. You can also set up as many sites as you want depending on your WordPress hosting plan.
Since WP Engine doesn’t offer domains (such as www.example.com), you’ll have to purchase a domain separately. In this tutorial, we’ll show you how to do this using Domain.com.
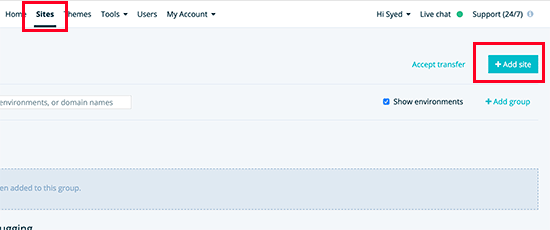
To start the installation, all you have to do is follow these steps. First, go to the dashboard, click on the Sites tab, and then click on Add Site.
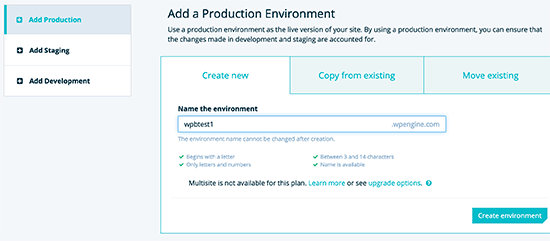
You’ll be asked to name the production environment. Enter any name you like, then click on the Create Environment button.
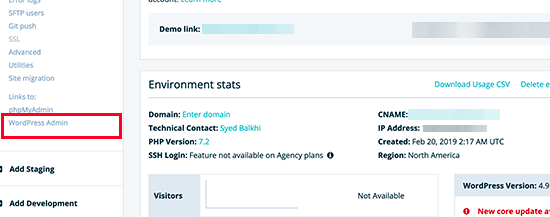
Next, WP Engine will create your WordPress environment. It may take a few hours for your domain to start working. After it’s done, you’ll be able to access the WordPress admin area with the login credentials shown on the right side.
Next, you need to connect a domain. To do that, you’ll need a domain link, but that can be only done by pointing your DNS settings to WP Engine. If you’re not sure how to do this, see this guide on what is DNS and how to change DNS records.
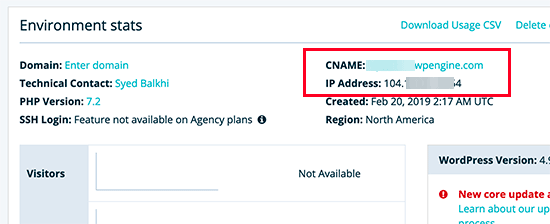
Once done, you’ll need to get your site’s IP address and CNAME from the overview page.
Then, go to Domain.com, log into your account, and on the dashboard, click on DNS and Nameserver.
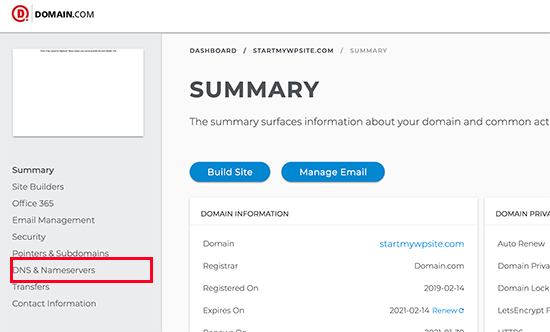
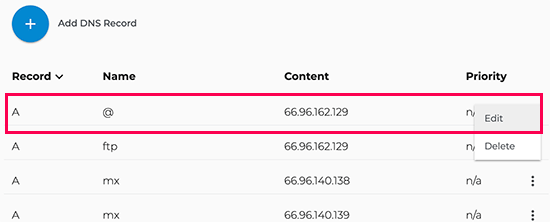
On the next screen, change the A record with the @ sign. Click on the three dots and then click on edit.
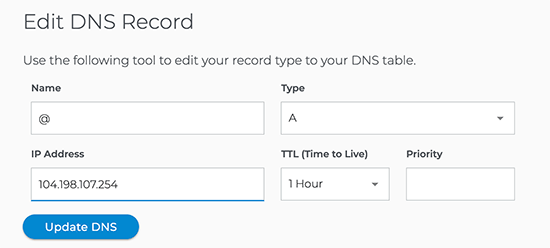
Once you’ve clicked on the Edit button, you’ll need to enter the IP Address from WP Engine and click on Update DNS.
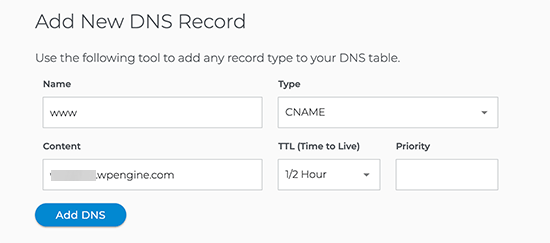
Next, you’ll have to add the CNAME with the www as its name. Edit the CNAME record and enter the details. If you don’t have the CNAME with www, then click on the Add DNS Record button, enter your CNAME, and click on Update DNS.
You’ve now successfully installed and pointed your domain to WP Engine. Enjoy your new website!
How To Install WordPress On NameCheap
Namecheap is a popular domain registrar and hosting provider. You can install WordPress on Namecheap from the cPanel using Softaculous.
In order to install WordPress on Namecheap, login to your Namecheap cPanel and then follow the steps mentioned in the “How to Install WordPress using Softaculous” section.
How To Install WordPress From cPanel
Before we get into the whole process, let us explain how cPanel works. cPanel is a web-based software or interface used by many web hosting companies that allows users to manage different aspects of their website.
cPanel supports many auto installer scripts that help in installing WordPress. Different hosting companies use different auto-installer scripts. For example, Namecheap uses Softaculous as their auto installer. The other two popular auto-installers are QuickInstall and Fantastico.
I’ll explain how to install WordPress using these auto-installers in detail below…
How To Install WordPress Using Softaculous
Start by logging in to your cPanel and click on Softaculous or WordPress installer in the auto-installers section.
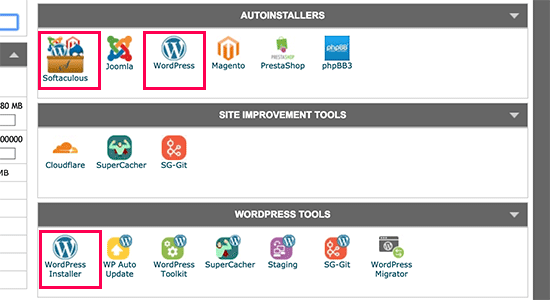
When you’ve clicked on it, you’ll see an overview of WordPress. Click on the Install tab.
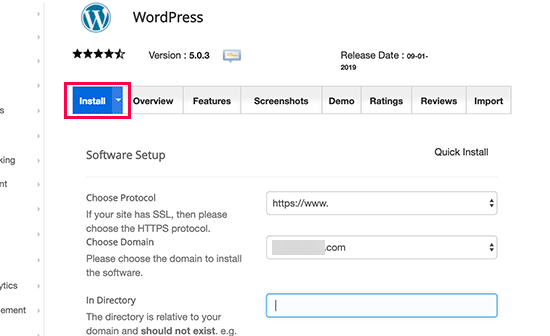
Softaculous will ask you to select a protocol. Choose http or https depending on whether you have an SSL certificate or not.
Then, choose the domain name where you want to install WordPress.
In the next field, which is In directory, leave it blank to install WordPress in the root directory of your website (i.e. without the www in your URL).
After that, you’ll see the Site Settings section. Here, you can enter the site’s name and description.
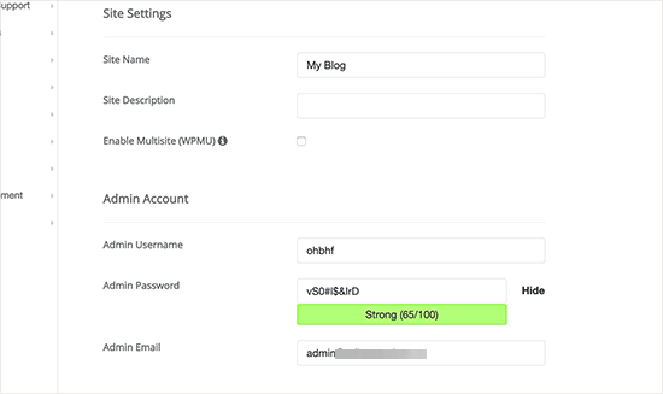
The next section is the Admin Account, where you’ll have to choose a username, password, and an active email. Softaculous will fill these fields automatically with a non-dictionary word in the username and a strong password. Double-check that you have entered the correct email address.
The rest of the fields are optional. You can leave them blank and then click on the Install button to run the installation.
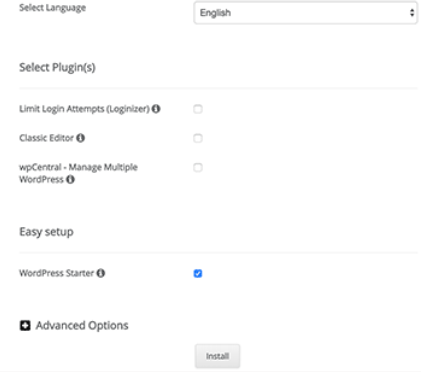
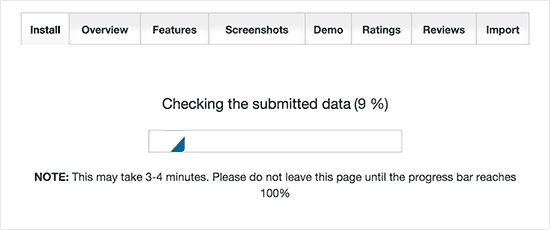
Don’t close the window until the progress bar shows 100%, or you’ll have to repeat the entire process again!
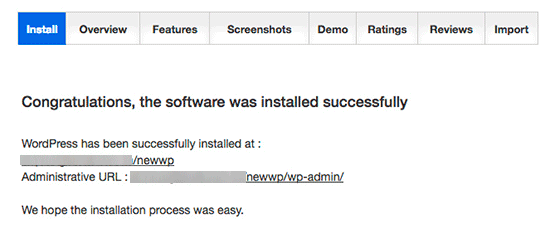
Once done, you’ll see a success message with the link to your website and your login URL.
That’s how you install WordPress using Softaculous!
How To Install WordPress Using QuickInstall
QuickInstall is another auto-installer used for installing various Content Management Systems (CMS) like WordPress, Joomla, and Magento.
We are going to use HostGator‘s cPanel to install WordPress using QuickInstall.
Login to HostGator’s cPanel and then scroll down to the Software section. Then, click on the QuickInstall icon.
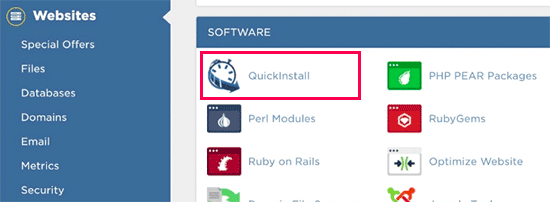
This will take you to the 1-click installer page where you need to click on the WordPress icon.

Here, you’ll be shown an overview of WordPress where you’ll select a domain from the drop down and leave the directory field blank. This will install WordPress on the root domain (without the www in your URL).
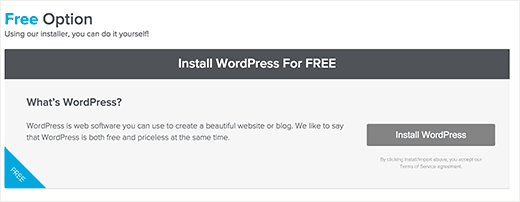
Once done, click on the Next button to continue. On the next screen, you’ll be asked to enter your username, password, and an active email along with your Site Title. After filling in this information, click on Install to start the process.
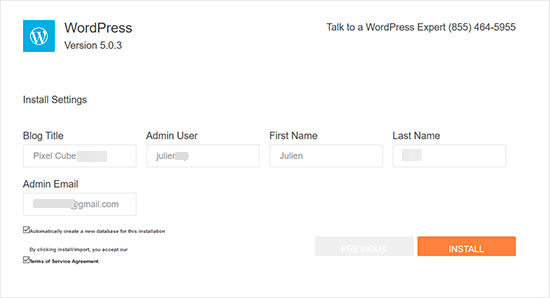
Once completed, you will see a success message along with your login details.
You’ve now successfully installed WordPress using QuickInstall.
How To Install WordPress Using Fantastico
Installing WordPress using Fantastico is more or less the same as the other two auto installers. Follow the steps below for better understanding.
First, log in to your hosting’s cPanel and then click on the Fantastico icon.
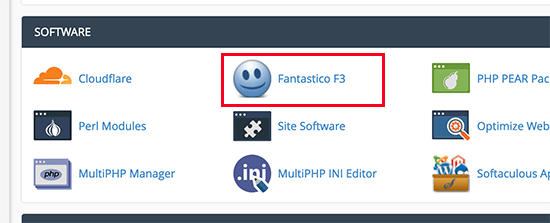
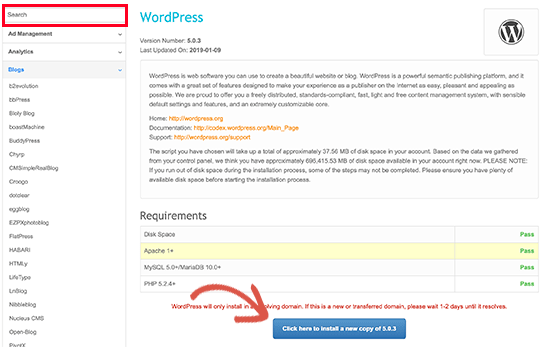
This will take you to Fantastico’s main screen where you’ll need to click on Blogs from the list of web applications at the left. Then, click on the Click here to install WordPress button.
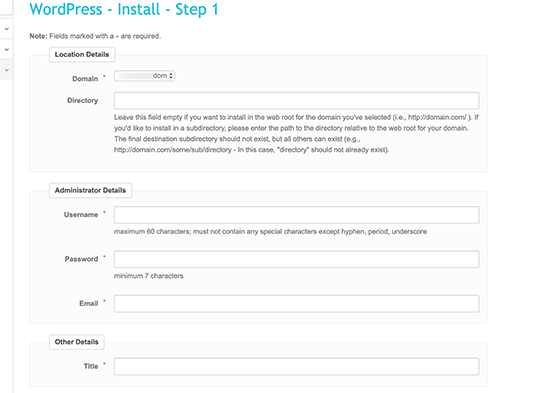
Choose the domain where you want to install WordPress. You can also install it in a sub-directory by entering the sub-domain in the field. If not, then you can leave the field blank.
Next, in the Administration Details, enter your username, password, and email, and click the Submit button once you’re done.
Once the installation is complete, you’ll get the success message with your login details.
How To Install WordPress Using FTP
This process is a little more complicated than the ones we saw above with auto-installers. So, if you’re a beginner, I highly recommend sticking to one of the methods above—Bluehost being the easiest.
Still, there are people who prefer to install WordPress manually. And for this, you need an FTP program like Filezilla (file manager) for manual installation.
To start the process, you’ll have to download the latest version of WordPress from WordPress.org and then extract the WordPress file.
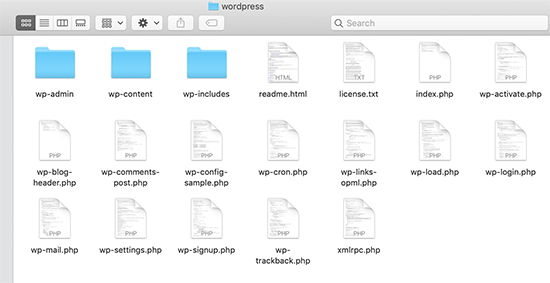
Start by connecting your FTP client to your hosting server. Once connected, upload the WordPress files you unzipped earlier to your web server.
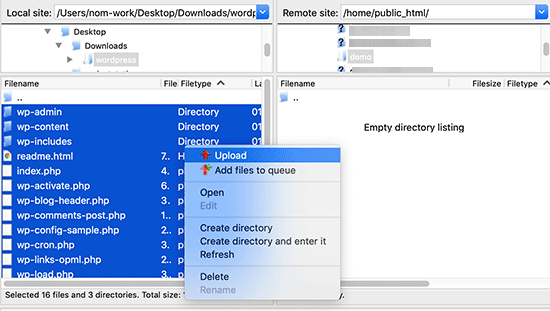
If you want to install your WordPress site to your root domain, you’ll need to upload the WordPress package to your website’s root directory. Look for the WordPress folder /public_html/blog/
After you upload the WordPress files, go to your hosting’s control panel, look for MySQL database, and click on it to create a database.

On the next screen, you’ll see a field to enter your database name. Enter a name that’s easy to remember and click on Create Database.

Next, you’ll need to add a username and password for your new database. Scroll down on your MySQL page to users, enter a username and password, and then click on the Create User button.
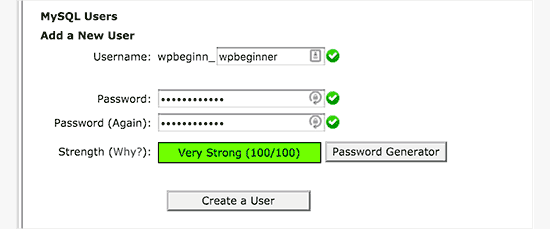
Here, you’ll need to add the database username that you just created. To do that, scroll down to Add User to a Database, select the username and the database you created, and then click on Add.

Then, select all privileges and click on the Make Changes button. Note down your database and user name and MySQL username and password.
Go to the URL where you uploaded your WordPress site and enter your domain name (https://example.com or https://www.example.com).
Once you’re done with that, choose your language and then click on Continue.
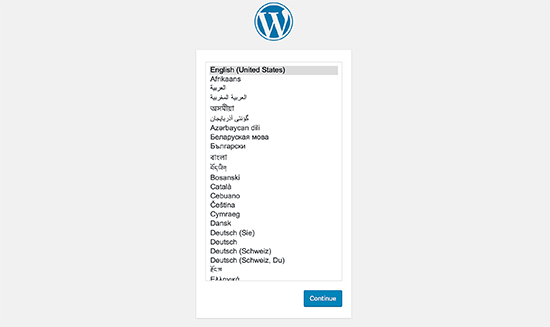
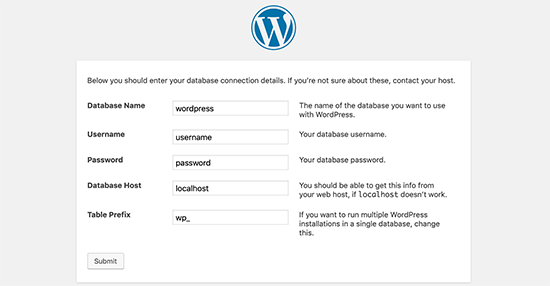
On the next page, click on Let’s go. On the next form, enter the database information from the one you just created and took note of earlier.
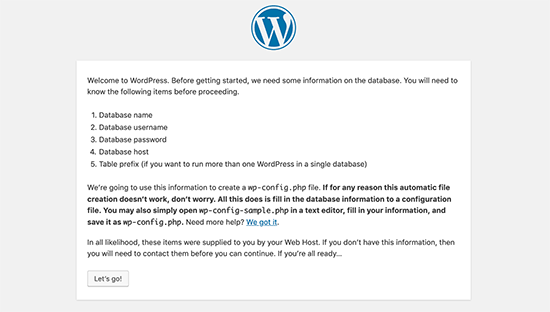
Once you’ve entered the details, click on the Submit button. WordPress will then connect to your database and show you a success message.
Once you’re done with everything the only thing left to do is to click on Run Installation to continue.

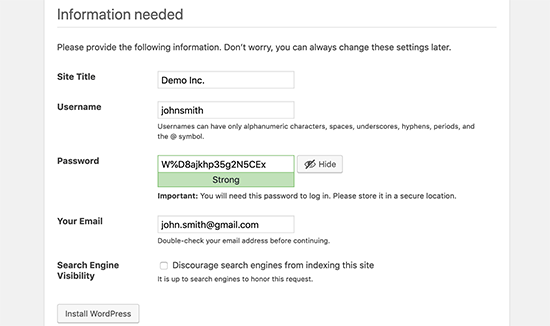
Once you’ve run the install, enter your username, password, admin email address, and site title. Leave the discourage search engines from indexing this site checkbox unchecked if you want your site to get listed on Google and other search engines.
Once you’re done, click on Install WordPress.
After the installation, you’ll get a success message showing your username. Enter your username and password to sign in to your WordPress site.
The login URL of your WordPress site will be something like, “yourdomain.com/wp-admin.”
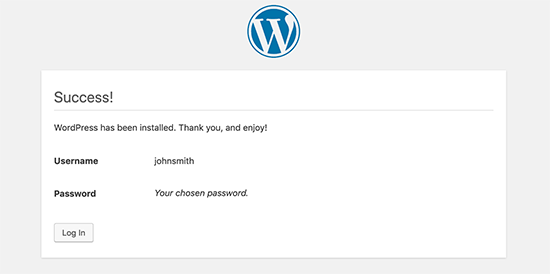
You’ve now successfully installed WordPress manually. This method is a bit complex, so we urge our readers, especially beginners, to choose hostings that automatically install WordPress (like Bluehost) or let the auto-installers do the work from cPanel.
If you still want to create a new database for WordPress and run the manual installation, check out some videos like the one below for more clarity.
How To Install WordPress Locally On Your Computer
Developers who build themes or plugins typically want to test them out on localhost before public release. Localhost is a server that they’ve set up on their PC or Mac. This localhost acts as a test environment for the developers.
If you install WordPress locally on your computer, it won’t be available for others to see on the internet. So, beginners who are looking to build a site to reach out to an audience shouldn’t try this method.
Instead, this is best for testing things out on a staging site.
In order to use WordPress on your own computer, you’ll need to have a local server first. For PC users, you can download and install WAMP on your system, or if you’re a Mac user, you can use MAMP on your machine.
Then use this article where we show you how to install WordPress via an FTP: “How to Install WordPress using FTP”.
Final Verdict – Tutorial On How To Install WordPress
Installing WordPress is one of the first steps of starting a blog and something you don’t want to get wrong. That’s why we recommend using an auto-installer or getting a hosting service that has WordPress pre-installed.
In our opinion, there isn’t any better option than Bluehost. It automatically installs WordPress when you sign up, saving you from the hassle of doing it yourself. If you want to read more about hosting, then check out our best web hosting guide.
With that said, I hope that this tutorial on WordPress installation helped you out! If you have any other questions then do let us in the comments below.


Thank you for sharing your blog, seems to be useful information can’t wait to dig deep!
Thanks Elyana, happy you found it helpful!