
D o you want to learn how to edit your WordPress sidebar?
Knowing how to customize your WordPress sidebar can be a game-changer for blog owners.
You can promote products, place ads, or attach an email signup form—the possibilities are truly endless (and highly profitable!)
But, understanding how to customize your sidebar can be a challenge. There are a mind-boggling number of options and hidden settings – making the process a bit overwhelming without a proper tutorial.
And that’s exactly what I’ve prepared for you today.
In This Guide:
Let’s get started!
In a hurry?
Beaver Builder is one of the best drag-and-drop customizers for WordPress websites. You can create your own sidebar layouts and add interactive widgets with just a few clicks. Beaver Builder comes with a free plan with basic functions. Pricing for pro plans starts from $99 per year.
What Is A WordPress Sidebar?
A sidebar is a part of your website where you can display other information that’s not part of the main content. Your sidebar can appear on just one blog post, a couple of pages, or on every page of your website.
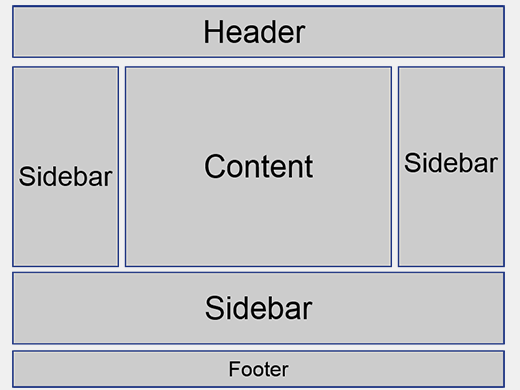
Most people consider sidebars to only take up, well, the side portions of their website. But the truth is, other areas qualify as sidebar space as well. Here’s a simple graphic to show you where sidebars are located if you just installed WordPress.
You can add widgets within the sidebar to create a website that is truly one of a kind.
I bet you’re wondering, “Okay, but what are sidebar widgets?”
I’m glad you asked!
What are WordPress Widgets?
Widgets are basically small blocks that you can add to your sidebar. Each widget has a unique function, such as showing blog posts, website forms, ads, or social media content. When you combine widgets, you can create a unique layout design for your blog.
It’s important that you add sidebar functions that complement your brand. For example, suppose you frequently use social media to reach your audience. In that case, including your social feed on your sidebar may be a good idea.
Adding a widget like that to your sidebar makes your blog look nice and can help you increase your followers and boost engagement on your social media profiles.
Interested in what else sidebar widgets can help you with?
Let’s take a look at some other benefits you can get from customizing your website’s sidebar.
Benefits Of Customizing & Editing Your Sidebar
As a blogger, there are a ton of ways you can benefit from customizing your sidebar. Some of the major benefits include:
- Improved navigation
Several widgets let you add a list of your best blog posts, a search bar, and direct links to your contact page. All of these features make it easier for new readers to navigate and interact with your blog.
- Get more email subscribers
Engaging with email subscribers is a great way to build brand loyalty. Your sidebar is the perfect place to ask your readers to subscribe to your newsletter and get future blog posts delivered straight to their inbox.
- Start making money online
Do you want to use Google Adsense to make money online? Great! A sidebar is a perfect place to place ads and one of the easiest ways to make your blog profitable.
- Create personalized experiences for your users
Changing your WordPress sidebar for individual pages lets you create unique experiences for your visitors based on the content they’re reading.
Now, let’s show you how to start editing the sidebar on your blog.
How to Edit Your Sidebar in WordPress: The Basics
Now that you understand the definition of a WordPress sidebar and the benefits of utilizing this space, it’s time to show you how it’s done:
Adding Widgets to the Sidebar
The first thing you need to do is to go to your WordPress dashboard. Look at the menu on the left side of the screen.
Click Appearance » Widgets.

After clicking the Widgets button, you’ll land on a page that looks something like this:

After clicking the Widgets button, you’ll land on a page that looks something like this:
On the left, you’ll see a list of available widgets you can insert on your WordPress sidebar. On the right side, you’ll see a sidebar column.
To add the widgets to your sidebar, you simply have to drag and drop them from the available widgets column to the sidebar column.
In this example, I decided to add a search bar to the blog. As you can see, when you drag and drop a widget to the sidebar column, you can tweak the settings to your liking.
I decided to add a title. Click Save after choosing the options you want for the widget.

There are plenty of different widget options depending on the plugins you have installed and your WordPress theme. I want to briefly go over some of the more important WordPress widget options so you can understand what you’re including on your sidebar.
- Archives – A summary of your published posts over the last month.
- Audio – Add audio clips to your sidebar. Great for bloggers that also have a relevant podcast.
- Categories – Use your most popular blog topics to create a category list. This feature makes it easier for visitors to find content that they want to read.
- Gallery – Show off some pictures that relate to your content or industry. You can use this feature to show off more engaging content.
- Navigation Menu – Move your navigation bar to your sidebar.
- Recent Comments – Spark a conversation by allowing your users to see what other people are saying on your posts.
- Search – Add a search bar directly to your blog so users can find specific posts.
Note: When you add WordPress plugins to the mix, your sidebar’s potential becomes virtually unlimited. Make sure you stick around because I’m going to explore smart ways to use plugins and add value to your WordPress sidebar.
Now that we’ve added our first widget let’s add a couple more by dragging and dropping them to the sidebar column.
In the screenshot below, you can see that I added a search bar, a contact form, and a video to the sidebar:

Of course, you can add whatever widgets you want to your sidebar.
After you’ve placed more than one widget, the options collapse into drop-down menus. Click each widget to see the corresponding options underneath. When you’re done making changes, be sure to click the blue Save button under each widget menu.

Changing the Order of Widgets
You can also change the order that widgets appear by clicking, dragging, and repositioning your choices within the sidebar menu.
So, if you want to move your contact form to the top of your sidebar, click on that widget and drag it to the top of the list. All other options will shift below the contact widget.
Once you’re done adjusting your widgets, save your work. Now, you can visit your blog and see if the changes appear as planned.
And don’t feel discouraged if you have to make some minor tweaks. It’s normal.
Removing Your WordPress Sidebar
Now that I’ve shown you how to add a sidebar and widgets to your WordPress blog, let’s look at how you can remove both from your site.
Start by going to your WordPress dashboard and click on Appearance » Widgets. You’ll land on the same page as before, except now you’ll see the widgets that you added under the sidebar column.
Delete the widgets from your sidebar by clicking the drop-down menu under each widget and clicking the Delete button.

Repeat this step until all of the widgets are removed from your sidebar.
It’s important to note that WordPress lets you save widgets that you like in case you change your mind later. This option is great for people who spend time perfecting their widget settings but want to wait before they use it.
All you have to do is click and drag the widget you want to save from the sidebar column down to the bottom of the page under the Inactive Widgets column.

Using this method, I was able to remove our sidebar and keep our search, category, and form widget settings for a later date.
How to Edit Your Sidebar Using Beaver Builder
If you don’t want to use the default WordPress customizer options to edit your sidebar, you can make the same changes using Beaver Builder.

Beaver Builder is a WordPress page builder plugin that lets you quickly and easily edit your website from the front end.
Its intuitive drag-and-drop interface lets you see changes in real time. Ultimately, this will make customizing more efficient and let you spend more time writing blog content!
After downloading and activating the Beaver Builder plugin – go to your WordPress dashboard. In the top corner, under your website name, click Visit Site from the drop-down menu.

Your site’s homepage will now load. At the top of the screen, you’ll see the regular WordPress menu with a new Beaver Builder button. Click the Beaver Builder button.
Now, you’ll see your site load in with the Beaver Builder menu. The menu looks like this:

To add a sidebar, click on the (+) button at the top of the screen. Then, click on the Rows button on the builder and you’ll see a list of different options for sidebars.
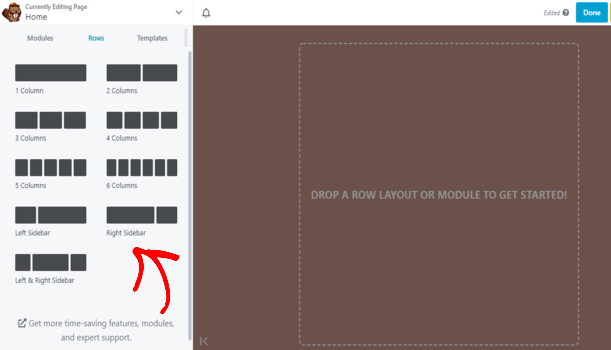
You can use the sidebar option that fits your blog, but I prefer the right sidebar. Most people tend to read from left to right, so it makes sense that any extras appear to the right of the main content.
Once you decide on the row you want to use, click and drag it to the right side of the screen so that it clicks in the highlighted area.
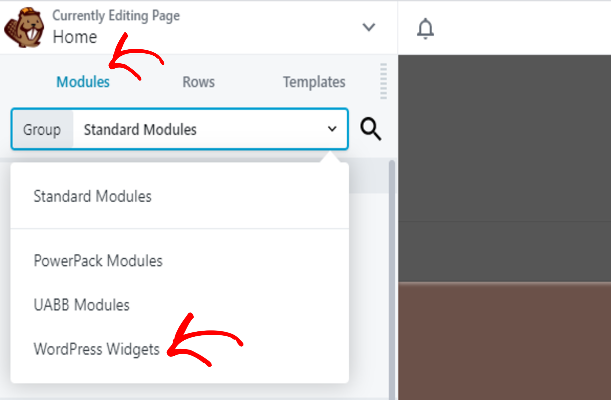
The next thing you should do is click the Modules button on the builder. You’ll see a drop-down at the top that says Standard Modules. Click the menu and select WordPress Widgets.
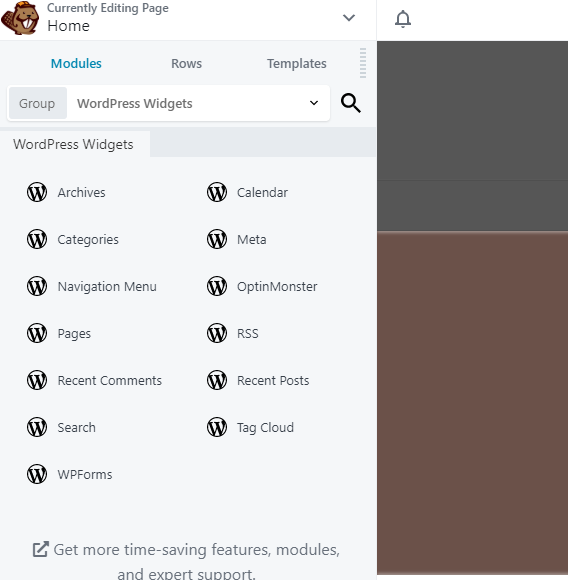
Here, you’ll see all the WordPress widgets I added to the site when I customized the sidebar from the backend.
You can add these widgets to your site with Beaver Builder by dragging and dropping them to the right side of your newly created row.
I’m going to add the search widget and show you how it looks once you drop it into the sidebar column:
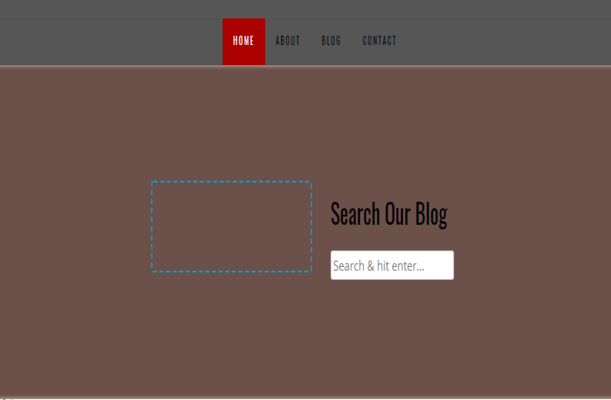
As you can see, the search box popped right in. The only issue is that the sidebar takes just as much space as the primary content. You can fix this issue by clicking the divider between your sidebar and content and dragging your content box to the right.
Let’s see how it looks now:

You can add multiple widgets to this sidebar space by simply dragging and dropping the widgets you want to the right column. For example, if you drag the archives widget to the sidebar column, it will snap into place above or below the search bar, depending on where you release your click.
Beaver Builder lets you customize the entire layout of your website, and it’s particularly helpful for creating a unique sidebar layout.
Also, Beaver Builder offers a free version of their plugin for those who want to test the tool before purchasing.
7 Ways to Customize Your WordPress Sidebar
Now that you understand how to edit your sidebar, you can begin thinking about using what you’ve learned to grow your blog. So, I figured I’d help you our and show you 7 ways to get more value from your sidebar space.
1. Add Menus to Your Sidebar
Most bloggers choose to add major pages in the header of their website. This is often called a navigation menu (or header menu) and it helps users find their way around your blog. Check out this tutorial on how to add a navigation menu in WordPress.
Depending on the style you want for your blog, you can also choose to add this navigation menu to your sidebar.
To create a vertical navigation bar in the sidebar, go to your WordPress dashboard and click on Appearance » Widgets. Next, drag the Navigation Menu widget to the sidebar column.
Create a title for your new widget and select the menu you want to display from the drop-down menu. Click Save to confirm your changes.

2. Add an Email Opt-in
Growing your email list is an excellent way to increase your blog traffic and visibility. You can increase your chances of getting more email subscribers with an email optin on your sidebar.
Several different plugins allow you to easily convert visitors into subscribers. But the quickest and easiest way to create an email optin is with OptinMonster.
OptinMonster allows you to make visually appealing, functional email optins that you can add in multiple spaces around your blog—including your sidebar.
Here’s an example of a sidebar email optin from their website:

Before you can add OptinMonster to your WordPress sidebar, you must install the plugin and create your first campaign.
Check out this post to learn how to create an email optin campaign using OptinMonster.
Once you’ve downloaded OptinMonster and created the form you want to display, click on Appearance » Widgets from your WordPress dashboard.
Next, drag and drop the OptinMonster widget to your sidebar like I’ve done with other widgets. Give your newly-created OptinMonster widget a name.

Then, you’ll select the campaign you want to display on your sidebar by clicking your newly created form from the Campaign drop-down menu. Click Save and you’re all set!
3. Show a Contact Form
Do you have a quick and easy way for readers to contact you through your website? You can streamline the way visitors engage with your brand by adding a contact form to your sidebar.
I highly recommend using the WordPress plugin WPForms as your go-to form solution. You can easily create fully customized contact forms using the simple drag-and-drop builder.
Now, if someone has a great idea for a future post, wants to share their thoughts on something you published, or simply wants to thank you for your work, they can reach you in just a few clicks.
To add a WPForms contact form to your website, you have to download the plugin and sign up for a WPForms account. Once done, you can create your first contact form in the builder.
After this step, you can go to your WordPress dashboard and head back to the Widgets tab. Look for the WPForms widget in your available list and drag it to the sidebar column.
Name your widget and select a form that you’d like to add to your blog from your account.

Click Save to finalize your new contact form and view your website to see how the contact form looks in the sidebar.

4. Display Your Social Media Feed
Social media marketing is one of the easiest ways to promote your blog. The more eyes you can get on your content, the better your chances you receiving more shares, comments, subscribers, and traffic.
If you want to grow your blog’s social media following, you can display your social media feed in your sidebar.
A tool like Smash Balloon’s Custom Facebook Feed lets you quickly add your Facebook feed to your WordPress sidebar.
Here’s how your Facebook feed will look on your sidebar:

Now, when a visitor lands on your blog, they will see your most recent posts. This keeps users engaged with your website and encourages them to interact with you on social media.
It’s worth noting that Smash Balloon also makes social media plugins for people that use YouTube, Twitter, and Instagram. Therefore, you can connect multiple social media platforms depending on your use.
Before adding your Facebook page or group feed to your sidebar, you must sign up for an account on Smash Balloon and download the Facebook Feed Pro plugin for your website.
You’ll notice a new menu on your WordPress dashboard that reads Facebook Feed. Click it to see a list of options with a button that says Connect a Facebook Account. Follow the prompts to connect your Facebook account to your blog.

Now that you’re connected, you can add the [custom-facebook-feed] code to your pages to display your social feed. If you want to add the feed to your sidebar, go to Appearance » Widgets from your dashboard.
Drag and drop a basic text block over to your sidebar column. In the text box, insert the new [custom-facebook-feed] shortcode and click Save.

For step-by-step instructions, check out our post on how to display Facebook feed on your website’s sidebar.
5. Make Money with Google AdSense
I’m guessing you probably want to monetize your blog, right?
Google AdSense is a program that allows you to place ads on your site. When someone opens your website, they’ll see ads based on their shopping habits or from a pool of pre-selected advertisements. If the visitors clicks one of the ads on your sidebar, you make a commission.
The good news is if you’re using WordPress, you can easily add Google AdSense to your website. It may take a while before you start making a steady income with AdSense. Still, it’s absolutely possible if you’re consistently promoting your brand and creating new content.
To display ads in the sidebar, click on Appearance >> Widgets. Now click on the Custom HTML widget and drag it to your sidebar.
You can name your custom HTML widget—I named mine Google Adsense. Next, you’ll want to add your Google Adsense code to the content box.

Click Save to finalize your changes.
6. Show Popular Related Articles
Are you still looking for ways to get more value from your sidebar?
Believe it or not, you can add even more value to your website by highlighting your popular blog posts for visitors to read.
Now, if someone finds one of your blog posts on Google and clicks through, they will see a list of the most popular posts on your sidebar. The result? More readers will spend more time engaging with your website because they can quickly move on to another blog post once they finish the one they landed on.
Here’s a great example of what a popular posts sidebar widget looks like:

If you want to add your popular posts, you can download a plugin like WordPress Popular Posts.
Once the installation is complete, you have to go back to the Widgets page from your WordPress dashboard.
Next, drag and drop the Popular Posts widget on your sidebar. Now, you can name your widget like before, and choose how many popular posts you want to display in the widget space from the drop-down menu. Click Save, and you’re good to go!
Or, you can use MonsterInsights to display popular posts in your sidebar. MonsterInsights’ popular posts features lets you display up to 10 posts in a widget container!
You can also display popular posts right inside the body of a post/page, show teaser images, and showcase popular products.

7. Create Different WordPress Sidebars for a Specific Page/Category
Finally, you can display unique WordPress sidebars depending on the specific page or category your visitors are browsing. This tip is great if you want to change the email optin, popular posts, or contact forms for individual pages.
Let’s say you have a blog about gardening. You can create slight variations in your email optin form to entice visitors to subscribe based on the content they are reading. Imagine if someone found your post about handling and growing roses, and they are met with an optin form that says, “Subscribe for more tips on growing beautiful roses.”
You can take that optin and create slight variations for all of the topics you cover in your blog. This will keep your sidebar content relevant to the main post, which is important for keeping your bounce rate low, and your engagement rate high.
Add a custom sidebar to specific pages by downloading a plugin like Easy Custom Sidebar and set up the pages you want to show a custom sidebar on by following this step by step guide.
Once you pick the pages and get everything set up, it’s time to go back to the Widgets page on your website. You’ll notice that there’s a new column with the custom sidebars you created during the setup.
Drag and drop the widgets you want to use to the new custom column.

Key Takeaways on Editing the Sidebar of Your WordPress Blog
- Understand the WordPress Sidebar: It’s a customizable area of your website where you can display various types of content that are not part of the main article, like widgets for social media feeds, ads, or popular posts.
- Widgets Are Your Best Friends: Use widgets to add functionality and content to your sidebar. Widgets can include blog post archives, audio clips, social media feeds, and more, enabling you to create a unique layout for your blog.
- Benefits of Customizing Your Sidebar: Customizing your sidebar can improve site navigation, help you gain more email subscribers, monetize your site through ads, and offer personalized user experiences.
- Basic Steps to Edit Your Sidebar: Access your WordPress dashboard, navigate to Appearance » Widgets, and drag and drop your chosen widgets into the sidebar area. Adjust the settings of each widget as needed.
- Consider Using Beaver Builder for Advanced Customization: If you prefer a more intuitive drag-and-drop interface for editing your sidebar, Beaver Builder offers a powerful alternative with real-time preview capabilities.
- Strategies for Sidebar Customization: Add navigation menus or an email opt-in form to boost user engagement and grow your subscriber list. Incorporate a contact form or display your social media feed to improve communication and interaction with your audience. Use Google AdSense or showcase your most popular blog posts to optimize your blog monetization and highlight your best content.
- Create Unique Experiences with Custom Sidebars: Tailor your WordPress sidebars for specific pages or categories to provide relevant content and calls to action, enhancing the overall user experience.
Editing Your Sidebar in WordPress in Conclusion
And there you have it! Now that you know how to edit your sidebar in WordPress, it’s easy to see why many bloggers think a customized sidebar is essential for their website. The various uses make sidebars one of the most valuable tools for new and veteran bloggers.
As your site evolves, you’ll change your sidebar and get comfortable with the different customization options. Take it slow and follow this guide, and before long, you’ll have a great-looking sidebar that will help you grow your blog.
If you liked this post and want to learn more about WordPress, check out my list of the best WordPress plugins for blogs!
And don’t forget to sign up for my email newsletter for more helpful blogging tips!

As a marketing analyst who routinely requires these tools I found it to be very insightful, thanks
As a marketing analyst familiarising themselves with the tools of the trade i found this piece to be very insightful.