
D o you want to turn your long URLs into shorter links?
If so – welcome. I will show you how to create trackable, short URLs in WordPress with just 3 easy steps :).
When you create a new blog, it’s important to make links as appealing as possible for readers to take action. Long, ugly URLs might turn visitors away. But shorter, visually appealing links encourage users to click – bringing YOU more traffic and revenue.
And please feel free to jump ahead to any section that interests you:
In This Guide:
Let’s first go into more detail as to why it’s a good idea to shorten your links…
Why Shorten URL Links on Your WordPress Site?
Link shortening is important because it takes a long, difficult-to-remember link and turns it into a link that’s shorter and easier to remember.
Instead of a URL looking like this:
www.yoursite.com/index.php?=94724879847928374928734982
It would turn into a shortened, custom link like this:
www.yoursite.com/product
The short link still directs users to the same place as the long one, but the shorter link looks much nicer.
So, why does it matter?
Here are a few of the benefits of shortening links on your blog:
- Make Links Appealing
If users see long URLs like the first example we shared above, not only are they less likely to click through, but it also hurts your brand’s credibility. Longer links are suspicious and signal to new visitors that your site may cause spam, threats, unwanted popups, etc. Professional blogs take the time to properly manage their links to build trust with their readers and encourage them to take the next step. Without link shortening, you could be turning away potential customers who take their security seriously.
- Increase Social Sharing
When you shorten your links, it’s easier for you and your readers to share them on social media platforms like Instagram and Twitter, as well as other places on the web. It’s much easier to type short URLs than long default URLs. Plus, shorter links give you more room to work with in social media posts since they won’t use up as many characters of your character limit. Social sharing is a key step to driving more organic traffic to your site and boosting engagement.
- Boost SEO
Shortening links on your site can also improve your search engine ranking. Because it’s difficult to index sites with long URLs, Google and other search engines want URLs that are easy to index and follow the latest SEO practices, like including relevant keywords. However, keeping long URLs on your site can also result in broken links and a poor user experience.
- Mask Affiliate Links
By creating short links, you can also improve your affiliate marketing strategy. Affiliate links are typically very long and full of tracking parameters, which can scare users off from clicking on them. But, with a short, custom link, more readers will likely click on your affiliate links and buy.
- Improve Link Management
Going through each link on your website and directing it where you want is time-consuming. Instead of laboring over your link strategy, using the best link management plugin for WordPress frees up your time so you can focus on other things. It also ensures that your links look how you want them to without the hassle of editing each one. Plus, most affiliate link management tools let you monitor the performance of your links with visitors. So, you can use these insights to tweak your overall marketing strategy.
Now that you know how shorter links can benefit your blogging strategy, we’ll show you how to easily create short links using the best WordPress short link plugin…
How to Create a Short URL Link in WordPress with Pretty Links
To shorten your links, we recommend using a plugin called Pretty Links.

Pretty Links is the best WordPress URL link management plugin. It transforms unappealing, long links into shorter, prettier ones. And you don’t need to mess with any code, making the WordPress URL shortener plugin super beginner-friendly.
The shortened links you create with Pretty Links can be shared anywhere, including social media, email campaigns, PDF and Word Documents, forums, QR Codes, and more.
Unlike other link management tools like Bitly or Tiny URL, Pretty Links lets you create short links from your domain. This gives your blog additional credibility, helping you build trust with visitors.
As a blogger, I find the keyword replacement feature super useful. Pretty Links will analyze your content and automatically add links to the keywords you’ve specified.
Pretty Links comes with other powerful features like:
- User data and analytics
- Nofollow and no-index links
- Custom URL slugs
- Link grouping based on products, affiliates, and more
- Detailed user reports
- Cookie-based system for tracking visitor activity across clicks
- And more…
If you want to learn how to create a short link in WordPress with Pretty Links, let’s dive into the steps right now.
And if you’d prefer to follow along with a video walkthrough on how to shorten URLs, here’s that too!
1. Install and Activate the Pretty Links Plugin
First, you’ll need to install and activate Pretty Links on your WordPress site.
You can download the free version straight from WordPress and start using your new plugin right away. The free version comes with everything you need to create custom short URL links.
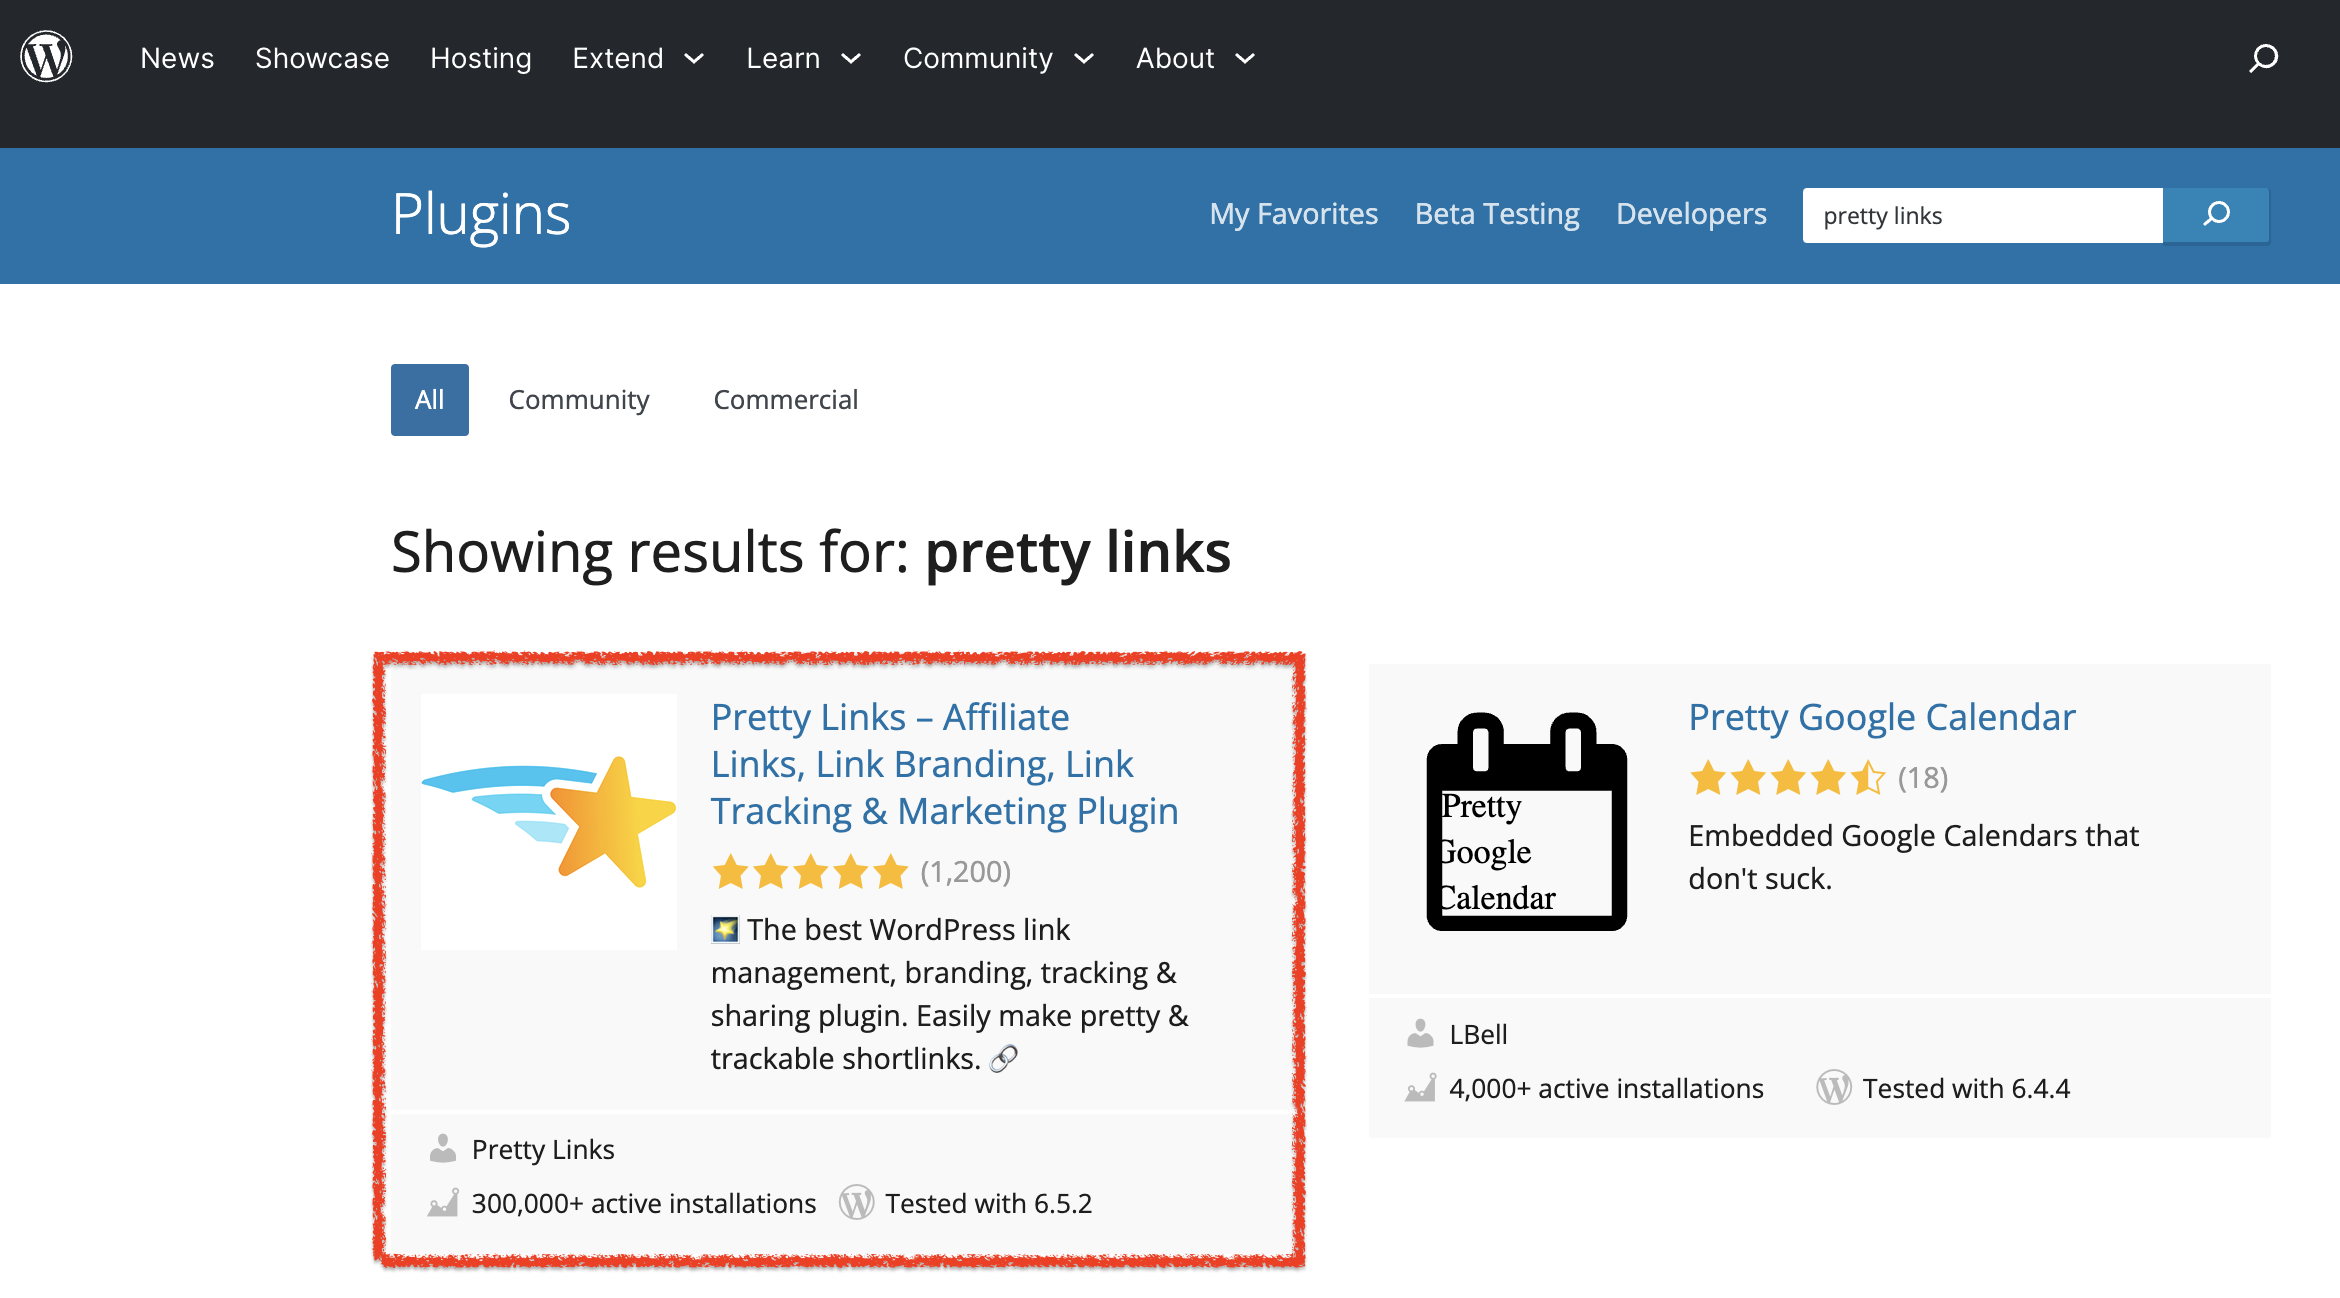
If you’re looking for advanced link management features, you can also purchase a paid plan directly from Pretty Links by clicking the Get Pretty Links button on the website.
With a premium subscription to Pretty Links, you get access to powerful features like:
- Advanced redirect types
- Auto-create pretty links
- Auto-link keywords
- Priority support
- Robot filtering
- And more…
For this tutorial, however, we’re going to stick with the free version of Pretty Links.
If you need assistance with setting it up, check out our guide on how to install a WordPress plugin.
Once you’ve installed and activated the plugin, it’s time to create your first shortened link.
2. Create a New Link
After the plugin is installed, you’ll see a welcome page and the Pretty Links navigation link will be added to your WordPress admin dashboard.
From your WordPress dashboard, go to Pretty Links » Add New:
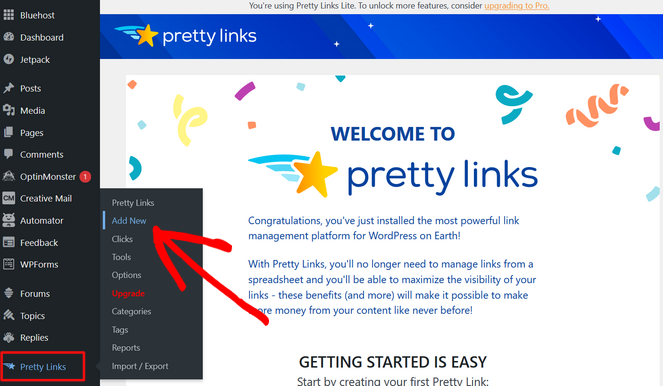
This will open up a page where you’ll be able to create a new pretty link.
At the top of the page, you can add a title. Adding a title will help you remember what you created each short link for. This makes it easier to manage your custom short links once you’ve created a lot of them.
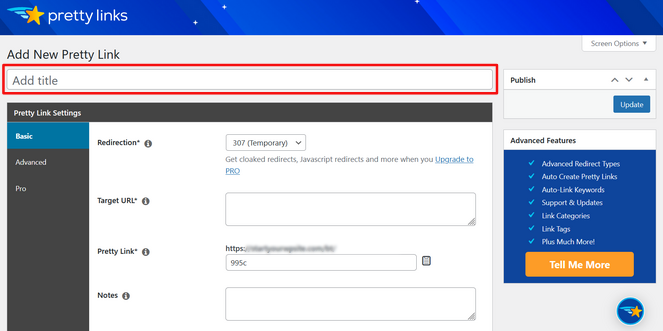
After you add a title, you need to decide what type of redirect you want your new link to be.
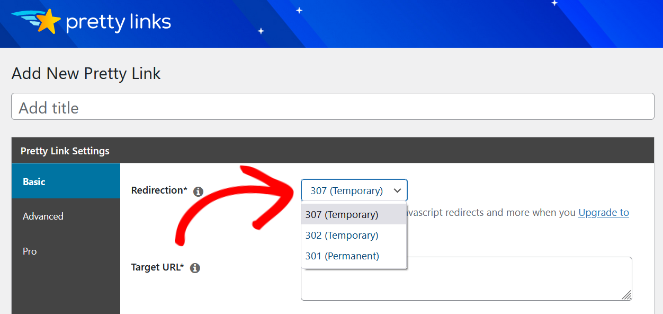
You can choose between:
- 307 (Temporary): This type tells search engines that this redirect may change in the future.
- 302 (Temporary): Best for redirects that only last for a certain amount of time or until it’s removed.
- 301 (Permanent): A permanent 301 redirect tells search engines that the original URL has been permanently moved to a new URL.
Depending on what kind of link you’re shortening, you can choose the appropriate redirect option without harming your SEO.
Next, you need to insert your Target URL. This is the original URL that you want to create a short link for. Users will be redirected to this page when clicking on your new short URL.
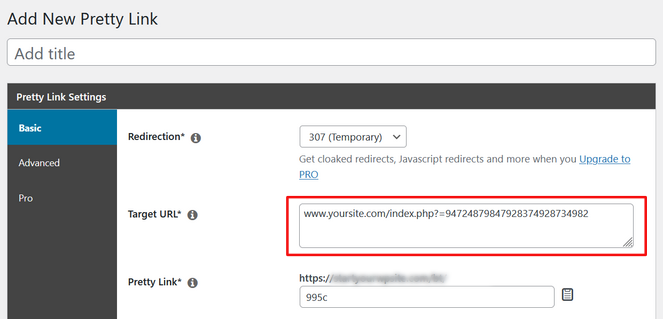
As you can see in the screenshot above, under Pretty Link*, a short Pretty Link is automatically created for you. But, you can also customize it to make it more readable or to match your brand.
There’s also a Notes section at the bottom where you can add details about the link so it’s easy to locate and remember. Your site visitors won’t see the notes you add.
In the Advanced tab, you can further customize your shortened link.

Here, you can configure 4 different settings:
- No Follow: Add a nofollow and noindex to your link’s http redirect header (recommended)
- Sponsored: Add a sponsored attribute to your link’s http redirect header (recommended for affiliate links)
- Parameter Forwarding: Forward parameters passed to this link onto the target URL
- Tracking: Enable Pretty Link’s built-in hit (click) tracking to monitor how your links are performing
When you’re done, click Update to save your work:
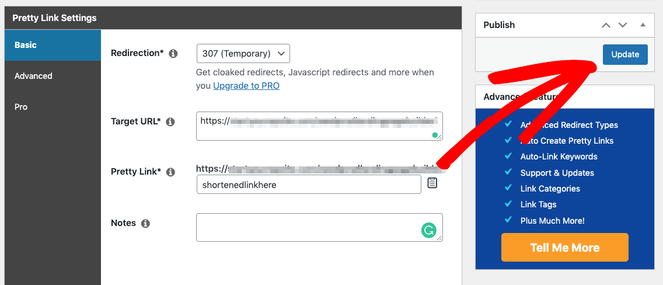
You’ve just successfully created your first shortened link!
When you hit the Update button, you’ll be taken to a new page where a list of your new links will appear once you create them.

You can see how many clicks your new links get on this page. You can also click the clipboard icon to copy your link to share it on social media or other platforms and start racking up clicks and engagement.
Note: Upgrading to the Pro plan allows you to add categories, tags, and keywords to your links as well.
3. Track Your Link Clicks
Once you create your Pretty Links, tracking their progress and seeing how they perform with users is crucial.
By going to Pretty Links » Clicks, you can track link clicks received during a specific time period:
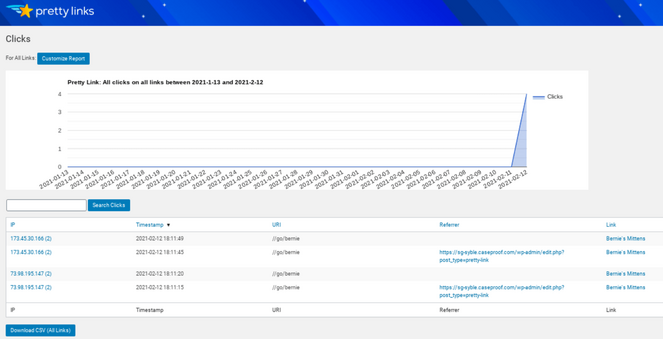
This report shows each link that has been clicked as well as the timestamp, URL, and referrer.
If you want to create more advanced reports to visualize your link data, you’ll need to upgrade to Pretty Links Pro.
Pretty Links Pro comes with all the reports, data, and analytical information you need to improve your current linking strategy.
By going to Pretty Links » Reports, you can create custom reports for your shortened links.
Here’s an example of a conversion report:
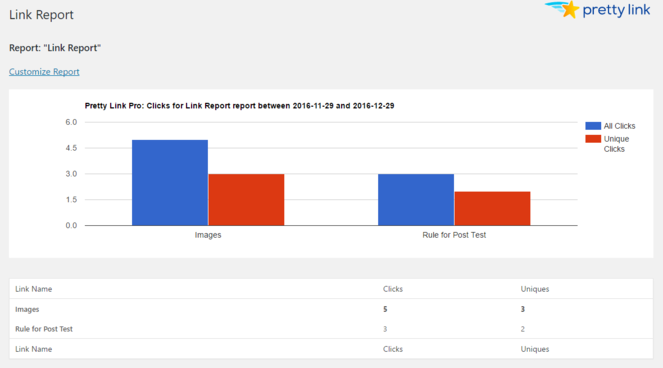
With a report like this, you can quickly see the results of your linking strategy.
Once you add the report you want to create, you can export it and use it however you like.
Creating a Short Link URL in WordPress in Closing
And that’s it! You’ve now successfully shortened the links on your WordPress blog.
We hope you enjoyed this tutorial. If you’re interested in other similar content, feel free to check out our post on the best WordPress plugins for bloggers. We go over all of the top tools that will help you take your blog to the next level.
And don’t forget to sign up for our email newsletter so you can get useful content like this sent right to your inbox!


Amazing