
W ant to learn how to create a Facebook group for your blog? You’re in the right place. We’ll show you how to make a Facebook group so that you can turn your readers into a community of loyal fans.
When you start a blog, connecting with your audience and building a stronger relationship with them is important. And one of the best ways to do it is by creating a Facebook group.
With a Facebook group, you can communicate directly with your readers through a fun platform that they’re probably already using. Plus, a successful Facebook group can also help you drive more traffic to your blog, boost engagement, grow your email list, and even make money.
In this article, we’ll show you how to create a Facebook group, step-by-step.
In This Guide:
But first, let’s go over what a Facebook group actually is…
What is a Facebook Group?
A Facebook group is a space that can be created on Facebook where users can join to become members. Once a user is a member of the group, they can interact with the group leader and the other members on a regular basis.
Here’s an example of a Facebook group by the blog WPBeginner:
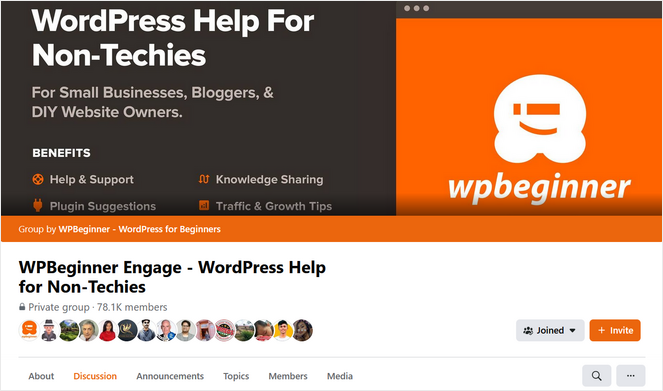
This group is dedicated to sharing tips and tricks about WordPress.
Now, you might be wondering, what is the difference between a Facebook page and group?
A Facebook page is basically a public profile for your business. It features information about your company and you can post general content for your followers. Users can post to your Facebook page, but it’s mostly hidden from other followers.
With a Facebook group, you can build a more interactive community. Members can post in the group and it will show up in the group feed where others can like or comment. Facebook groups can also be private so you can share more personal or exclusive content in them.
Now that you know more about Facebook groups, let’s talk about why you should create one…
Benefits of Making a Facebook Group
Have you ever met a new group of people that you instantly connect with? So much so that you want to become lifelong friends with them?
That’s what creating a Facebook group can do for your blog.
When you create a Facebook group for your blog or business, you’re able to build a community of like-minded people around your brand. This is the key to turning casual website visitors into loyal fans.
Because when your readers feel connected to your business and the community you’ve built, they’ll be more likely to stick around long-term, return to your site again and again, and even become customers.
Let’s take a look at all of the ways you can use a Facebook group to your advantage:
- Share your latest posts in the group and drive more traffic to your blog.
- Easily collect feedback and learn more about your audience by creating polls, asking questions, etc.
- Get new blog post ideas by reading the discussions group members are having.
- Improve brand loyalty and trust though regular, personal interactions with members.
- Build social proof and establish yourself as influencer or expert in your niche.
- Promote your online courses or other digital products within the group to boost sales.
- And much more…
The best part is that the Facebook algorithm really favors groups. So, you can be sure that all of your posts will appear in the Facebook feeds of your members. And if your members have notifications on, they’ll be notified as soon as you post.
How to Create a Facebook Group (Step-by-Step)
If you’re ready to start your own Facebook group, let’s get to it!
All you have to do is follow these easy steps…
Step 1: Decide the Purpose for Your Group
Before you actually start your group, you need to figure out why you’re starting it, what it will provide, and who you’re creating it for.
Defining the purpose of your Facebook group will help you keep it focused and it will make it easier for you to attract your target audience.
If you already have a blog, you have a headstart on figuring out the purpose of your Facebook group.
For example, if you have a travel blog, you could create a Facebook Group where you and other members can share travel tips.
In another example, the mom blog, All Moms Blog, made a Facebook group where mommy bloggers can support each other, network, and share tips:
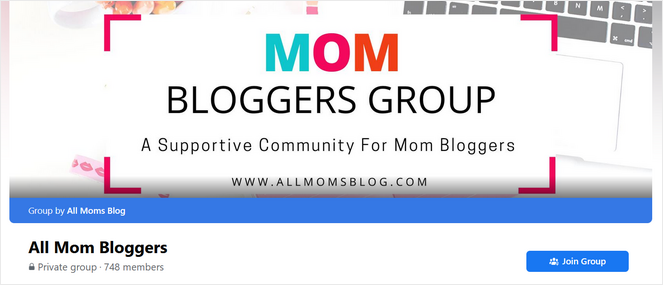
To help you decide on the purpose of your Facebook group, answer these questions:
- What is the main goal of your group? To connect with others? To promote your products/services? Or something else?
- What is your niche? What subject matter or topics will your group cover?
- What type of content will members get? Exclusive content they can’t find on your blog? Group discussions?
- Is the group just for your existing blog readers? Or, do you want to attract Facebook users that might not be aware of your blog?
No matter what type of Facebook group you want to create, have a clear idea about what it’s going to be before you start setting it up.
Step 2: Make a Facebook Group
Once you’ve decided what type of group you want to make, now it’s time for the fun part: creating it!
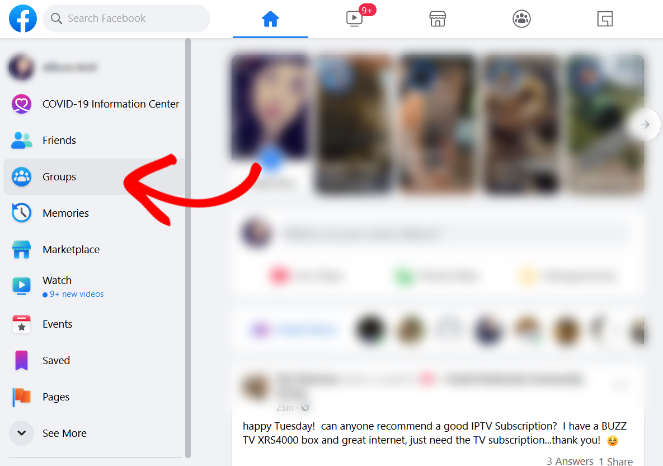
To make a Facebook group, log in to Facebook, and on the left-hand side, click Groups.
Next, click on the + Create New Group button.
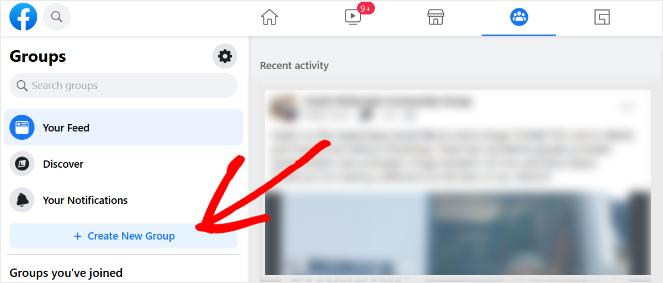
You’ll then be taken to a new page where you can begin to create your Facebook group. Here’s what it looks like:
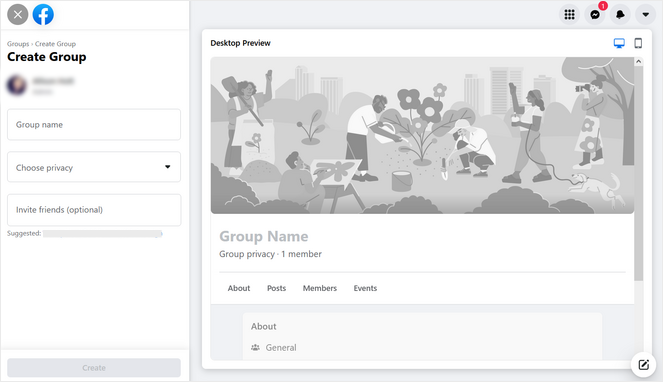
First, you need to choose a name for your group and type it in the Group name field.
To choose a good name, consider what your group is about and the goals of your target audience.
For example, WPBeginner’s Facebook group is called WPBeginner Engage – WordPress Help for Non-Techies.
From that name, users can tell that the group will help them learn more about WordPress as complete newbies.
Here are some other examples of Facebook group names to inspire you:
- The Solo Female Traveler Network
- Twitch Streamers Helping Twitch Streamers
- The Socially Distant Cooking Class
- Boss Girl Bloggers
- Mindful Budgeting – Take Control of Your Finances
After you’ve chosen a name for your group, you need to choose the privacy setting. From the Choose privacy dropdown menu, you can select either:
- Public: Anyone can see who’s in the group and what they post.
- Private: Only member’s can see who’s in the group and what they post.
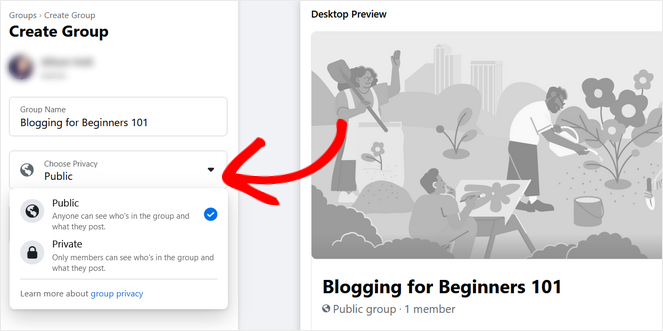
A public Facebook group would be best if you want as many people to see your posts or join the group as possible.
But, if you want to create a VIP group for only a select group of people, like people that have purchased your online course, then a private group might be the best option for you.
Underneath the privacy setting, you can also start inviting your Facebook friends to your group if you want.
When you’re done, click the large Create button at the bottom of the screen.
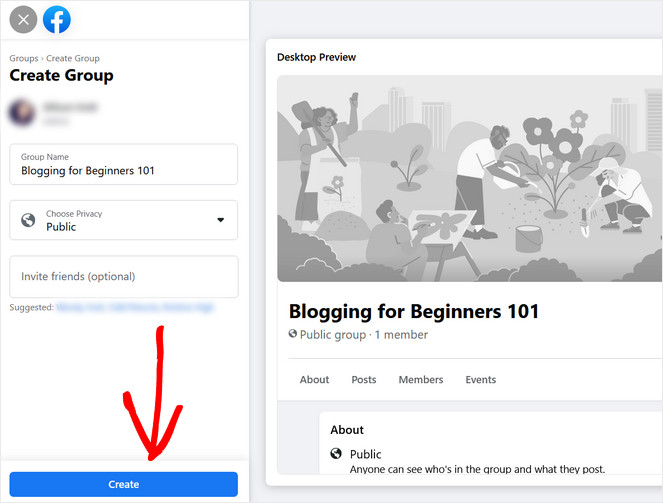
Next, there’s a few more steps to setting up your Facebook group.
Step 3: Set up Your Facebook Group
On the next page, you’ll see an overview of your Facebook group. On the left side, there are options for managing your group and on the right is a preview of how your group looks.
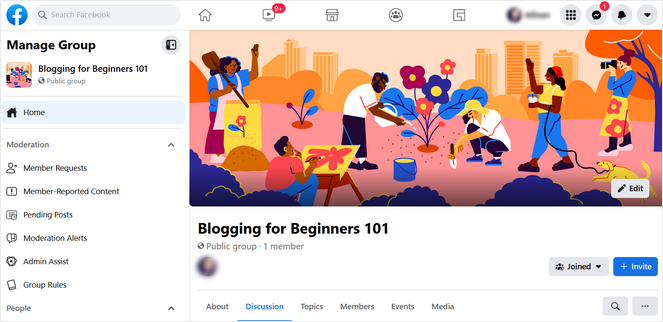
Also on the right side, you’ll see a prompt to finish setting up your Facebook group.
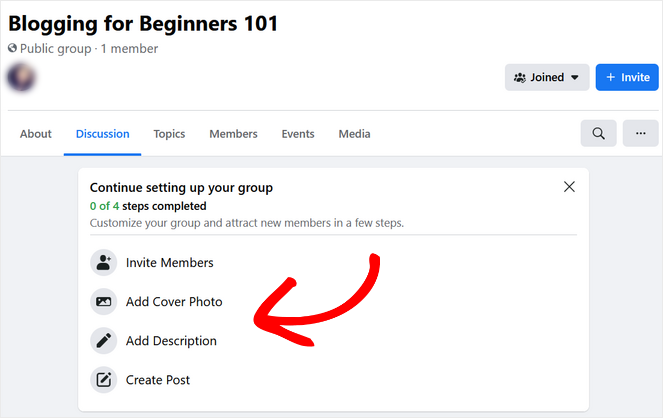
The main steps you need to complete right now are:
- Adding a cover photo
- Adding a description
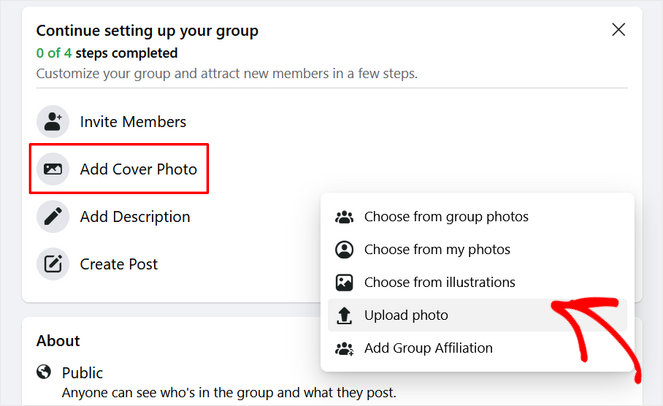
First, click on the Add Cover Photo option. You can choose a photo from your existing Facebook photos or upload a new photo from your computer.
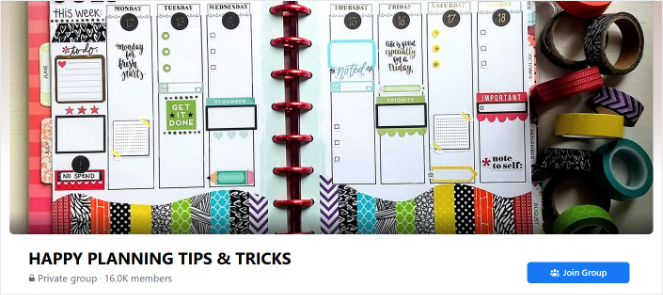
When choosing a cover photo, make sure it represents your Facebook group well.
For example, this cover photo for the Happy Planning Tips & Tricks Facebook group features a large photo of the Happy Planner itself:
Check out this post for tips on how to find a good image to use.
You could also design a cover photo with a photo of yourself or your blog’s logo using a free tool like Canva.
Once you’ve chosen a cover photo, click on Add Description.
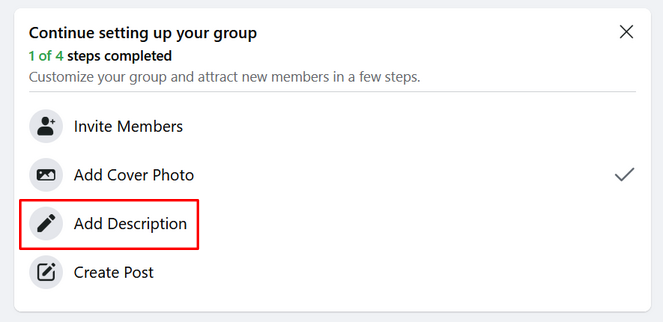
A small window will now open where you can type a description for your Facebook group:
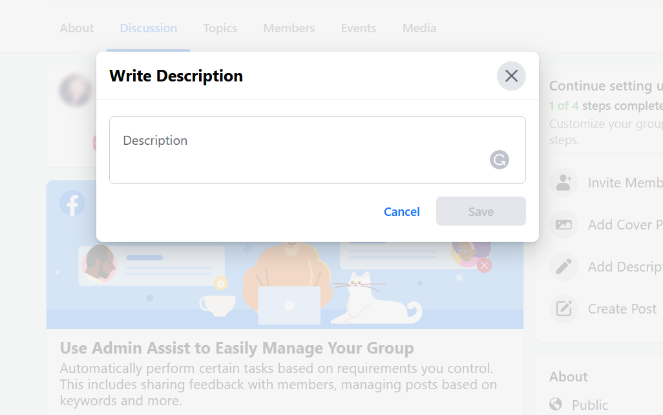
The description is the perfect place to tell users what your group is all about. It should include details like:
- Who you are
- What the purpose of the group is
- Who the group is for
- The group rules and expectations
- Information about any weekly events, if you have any
After filling out the description, click the Save button to continue.
Step 4: Create Your First Post
You don’t want your first few members to see a totally empty Facebook group once they join. So, you need to create your first post and get them interested.
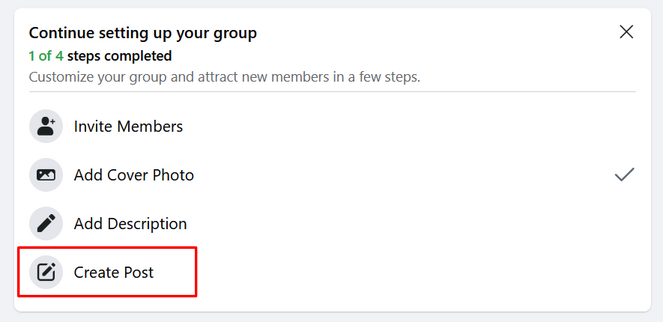
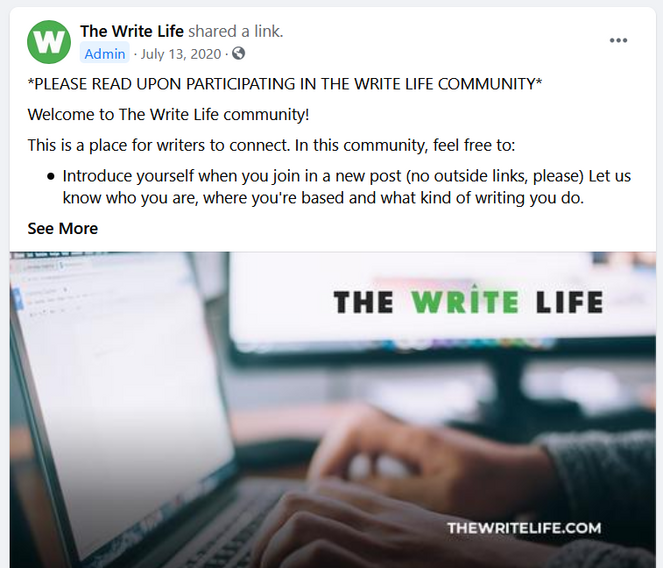
To start, we recommend creating a welcome post where you can greet members and tell them about the group. You can even encourage new members to introduce themselves to boost engagement.
Here’s an example just like that from The Write Life:
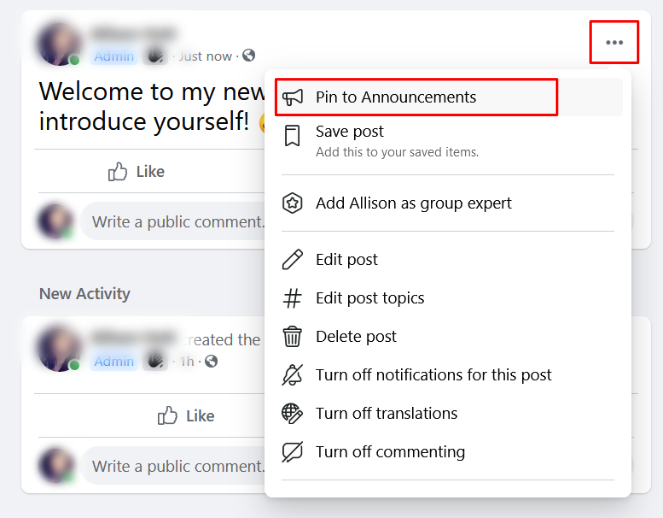
You can also pin your first post to the announcements. This ensures that your welcome post sticks to the top of the page and is the first thing that members see when they join.
Your Facebook group is now set up with all of the basics.
But, your work isn’t done yet.
It’s time to start getting the word out about your group and attracting new members.
Step 5: Promote Your Facebook Group
If you want your Facebook group to be a bustling community full of active members, then you need to start promoting it and inviting people to join.
You can start by inviting your family and friends on Facebook.
But, if you have a blog, you’ll also want to encourage your readers to join.
There are a number of ways you can turn your readers into Facebook group members.
Here are some ideas:
- Announce your Facebook group in your email newsletter
- Share your group in other Facebook groups (if the rules allow you to)
- Link to it in your social media profiles
- Write a blog post about it
- Create a specific landing page for your Facebook group
Another awesome way to grab the attention of your readers is by embedding your Facebook group in your website.
That way, whenever a user visits your site, they can get a sneak peek of the awesome content you share in the group, which will encourage them to join.
Here’s what your Facebook group feed could look like on your blog:
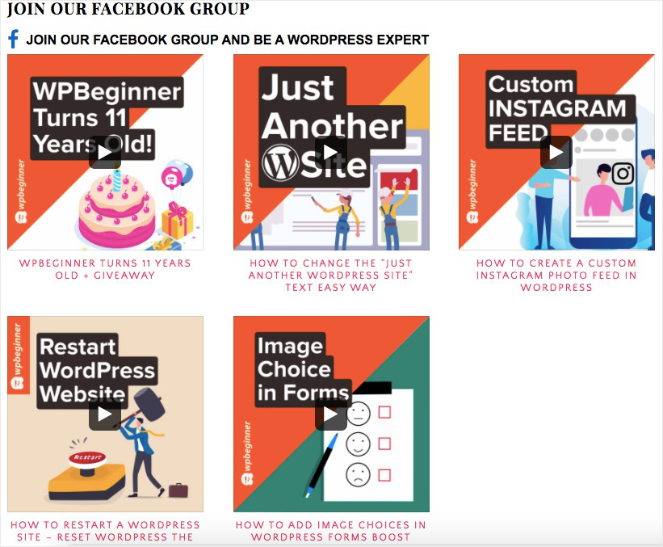
Cool, right?
And don’t worry, embedding a Facebook group in WordPress isn’t difficult. You can use a plugin like Smash Balloon to make it super easy.
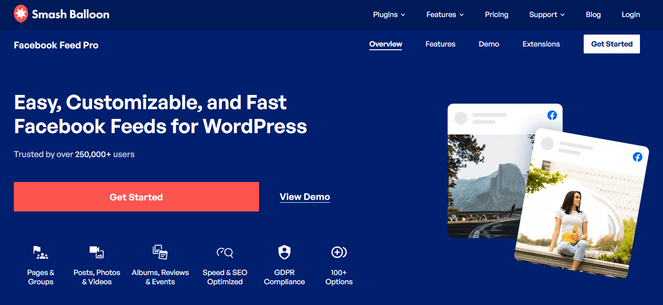
Smash Balloon’s Custom Facebook Feed Pro is the best way to seamlessly integrate your Facebook group into your website. It only takes a couple of minutes to set up; simply connect your Facebook account, choose your settings, and add the feed to your site.
You can choose from different feed layouts, design the feed to match your brand, pick what type of content you want to display, and much more.
Take a look at our detailed Smash Balloon review for more information.
Want to add your Facebook group to your blog? Check out our tutorial on how to embed a Facebook group in WordPress for step-by-step instructions.
Show me how!Step 6: Plan Content and Events for Your Group
By now, you’ve started a Facebook group and you’ve got some members. Awesome!
There’s just one problem…
Nobody is talking!
And an inactive group isn’t fun for anyone.
So, you’ve got to get the ball rolling and encourage your members to participate. You can do this by planning content and events that spark conversation.
For example, WPBeginner hosts a monthly event on their Facebook group where members can post their WordPress websites and get feedback from other members:
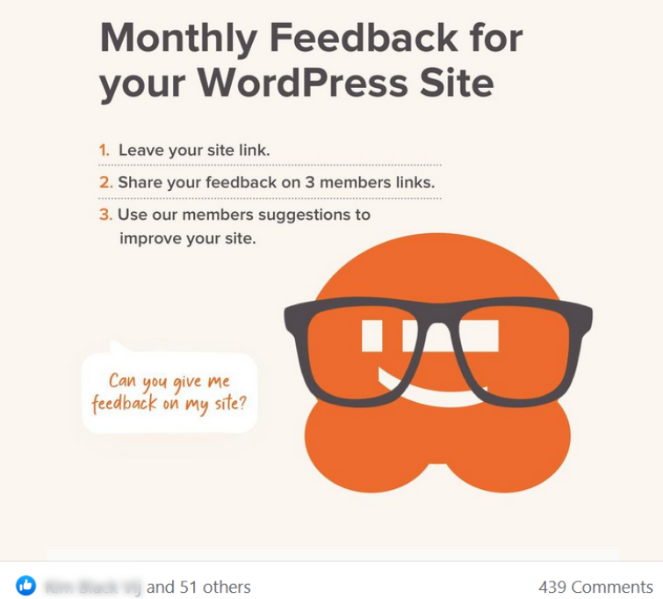
There’s 439 comments on this post alone, so you can see that this type of event generates a lot of engagement in the group.
If you’re not sure what type of content or events you should plan for your group, here are some more ideas:
- Daily Prompts: You can ask simple questions like ‘What’s your favorite hack for writing faster?’ or ‘Do you prefer coffee or tea?’.
- Conversation Threads: Discuss a particular subject and encourage members to share their opinions in the comments.
- Q&As: Use Facebook Live to answer questions from your members in real-time.
- Challenges: You can host fun challenges like reading sprints or step counting for fitness.
- Polls: Use Facebook’s Poll feature to ask a question and find out what option your members choose.
To save time, you can schedule your Facebook group events using a social media scheduler like Buffer. You can also use SEMrush to do this. SEMrush is mainly an SEO tool but it also has a helpful social media poster feature.
Step 7: Engage with Your Members Regularly
Aside from simply posting content and events, it’s important that you interact with your group members on a regular basis.
After all, they likely joined because of you, so you need to be present and active in the group.
When your Facebook group is brand new, try to reply to all of the new posts and comments from your members. This will show members that you appreciate their contributions to the group and it encourages them to keep posting.
Replying to every post and comment should be easy when your group is new and small.
But, as your group grows, it might become impossible to reply to everything. In that case, you might need to prioritize what type of content you respond to.
You could also ask some loyal members to become admins or moderators for your Facebook group. This enables them to help you manage the group and respond to questions and comments when you aren’t able to.
FAQs About Making a Facebook Group
Can anyone start a Facebook group?
Yes, anyone can start a Facebook group. All you need is a Facebook account, which is free.
What are good rules for my Facebook group?
Facebook has some example rules you can use for your group, including:
- Be Kind and Courteous
- No Hate Speech or Bullying
- No Promotions or Spam
- Respect Everyone’s Privacy
These should be enough to get you started, but you can add your own rules if necessary.
And remember, creating rules for your group will help it function properly and help you maintain a safe and comfortable space for your members. So, it’s important that you have them.
How often should I post in my Facebook group?
When your group is new, we recommend posting in it at least once a day.
As your Facebook group grows and members are making posts more often, you can reduce the amount you’re posting yourself.
Can you make money from Facebook groups?
You can’t earn money from Facebook for having a group. But you can definitely use your Facebook group to make money with affiliate marketing and by promoting and selling your own products/services.
That’s a wrap! Now you know how to create a Facebook group to build a loyal community around your blog.
If you enjoyed this post, then you might want to check out our blogger’s guide to Instagram as well.
And don’t forget to sign up for our email newsletter so you can get useful content like this sent right to your inbox!


Thanks for sharing this informative guide on creating Facebook group for our blogs.