
A re you wondering how to run a giveaway on your WordPress blog?
Creating an online giveaway is an excellent way to drive more traffic to your blog, get more email subscribers, and increase social engagement.
But despite this, you may have heard some horror stories about how complex it is to run giveaway campaigns.
Not to worry.
In this article, I’ll show you how easy it is to set up and run a successful giveaway on your WordPress blog using RafflePress.
In This Guide:
Key Takeaways for How To Host a Giveaway on Your Blog
- Set Your Goals and Objectives: Decide what you want to achieve from your giveaway (e.g., drive traffic, grow email subscribers, increase social followers). Choose a prize relevant to your blog or business.
- Select Your Prizes: Choose a prize that is relevant to your blog or business. Larger businesses may have more budget and contacts to offer more expensive prizes, but smaller businesses can still offer useful prizes.
- Set Your Rules and Parameters: Decide how people can enter the giveaway (e.g., email newsletter, social media follow). Specify rules, such as age limits, restricted locations, and entry limits. Choose a method for selecting the winner (e.g., random draw, correct answer).
- Use a Giveaway Plugin: RafflePress is a popular and easy-to-use plugin for creating and managing giveaways on WordPress.
- Create and Customize Your Giveaway: Name your giveaway and select a template. Add prize details, including name, description, and image. Choose entry methods and configure settings.
- Publish and Promote Your Giveaway: Publish the giveaway on your blog using RafflePress. Promote the giveaway through social media, email marketing, and targeted ads.
- Monitor and Engage: Monitor the giveaway’s progress and engage with participants. Select the winner using the plugin and notify them via email. Announce the winner publicly and continue engaging with new subscribers and followers.
Why Run a Giveaway or Contest With Your Blog?
You’ve probably seen online giveaways on websites and social media channels such as Facebook and Instagram.
But there’s one valid reason you should run a giveaway on your blog. And that’s because you have more control.
For instance, if you wanted to host a contest or giveaway on Facebook, you’d have to follow their rules and regulations, which might be too restrictive.
Hosting a giveaway on your WordPress site lets you control the user experience and target even more channels.
For example, if you run a giveaway on social media like Instagram, you’ll increase followers but struggle to get more email subscribers.
But if you host your giveaway on your site, you can get more email subscribers, Instagram followers, and engagement on other channels.
So, I recommend running the giveaway from your blog so you remain in total control.
And, what’s more, it’s not as difficult as you might think.
Later, I’ll show you how to set up and run your giveaway.
But first, you need to set your goals and objectives.
Set Your Goals and Objectives
Running a giveaway without an end goal would be a wasted opportunity to build your business.
So, decide what you want to achieve from your giveaway before anything else.
For example, you may want to:
- drive more website traffic
- get more email subscribers
- build user engagement on your site
- increase your social followers
- boost brand awareness
- capture more leads
- generate new sales
- promote an event
- launch a new product or service
Knowing what you want to achieve is a crucial factor in how you structure your giveaway.
To help you brainstorm, be sure to check out our article on blog giveaway ideas.
Select Your Prizes
Next, you’ll want to select your prizes.
The important thing here is to choose a prize that is relevant to your blog or business.
For example, offering garden tools as a prize would be pointless if your site was in the pet niche. You’d end up with many new subscribers and followers who wanted more garden info rather than pet training tips.
Choosing a relevant prize is more important than the number of prizes. Larger and more established businesses will most likely have a bigger budget and more industry contacts to acquire and offer more expensive prizes.
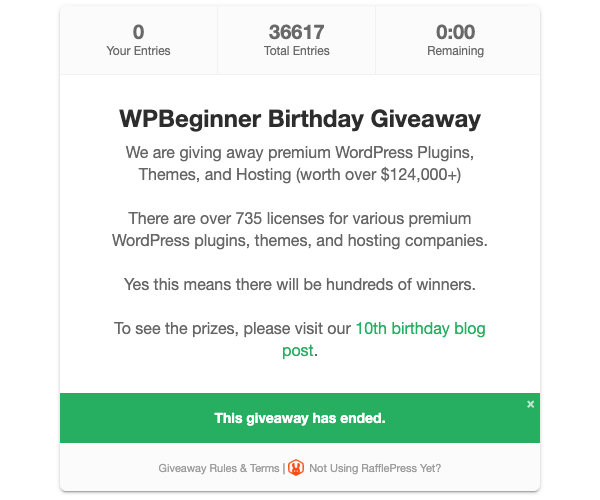
For example, WPBeginner was able to offer a huge list of WordPress-related prizes for their 10th Birthday Giveaway because of their contacts at over 70 companies:
But if you’re just starting out, don’t let that put you off.
Offer a prize related to your niche that is useful to your target audience.
Set Your Rules and Parameters
Next, you’ll want to set the rules and parameters for your giveaway.
First, decide what you want users to do to enter the giveaway. A simple giveaway often works best because entrants only have to enter their name and email address.
If you want to get more detailed, you might set a question that encourages entrants to search your site for information or check out your service or product.
For example, if you own a restaurant, you might ask a multiple-choice question like:
“How much does a 16 oz ribeye steak cost in our restaurant?”
- $15
- $25
- $35
Entrants must check your menu to confirm their answer, and you may pique their interest in booking a meal.
Whatever you decide, make it clear how people enter your giveaway. Make sure your entry method aligns with your goals. For example, if you want to grow your email subscribers, entrants must submit their email addresses.
Next, you’ll want to specify other parameters, for example:
- Giveaway rules: Who can enter? Are there age limits or restricted locations?
- Start and end dates: How long will the giveaway run?
- Limiting the entries: How many times can someone enter?
- Choosing the winner: Will you use a random draw, a correct answer, or another method?
- Announcing the winner: When and how will the winner be announced?
Once you have sorted your goals, rules, and prizes, it’s time to set up the giveaway.
How to Create a Successful Giveaway [With The Best WordPress Giveaway Tool]
RafflePress is the best giveaway plugin for WordPress. It’s intuitive, easy to use, and has all the necessary features to drive more traffic, grow email subscribers, and increase social followers.
- Drag and drop giveaway builder
- Pre-built giveaway templates
- Powerful social media integrations
- Highly optimized giveaway landing page
- Advanced tracking and retargetting
Note: For this tutorial I’m using RafflePress Growth. But there’s also a free version available that lets you create a basic giveaway.
If you want to learn how to create a basic giveaway with the Lite version, check this out:
But now let’s take a look at the more advanced giveaway option:
Step 1: Create Your Giveaway
Once you’ve purchased and downloaded the RafflePress plugin, you can install and activate the plugin using your license key.
Note: If you need help, follow our step-by-step guide on how to install a plugin in WordPress.
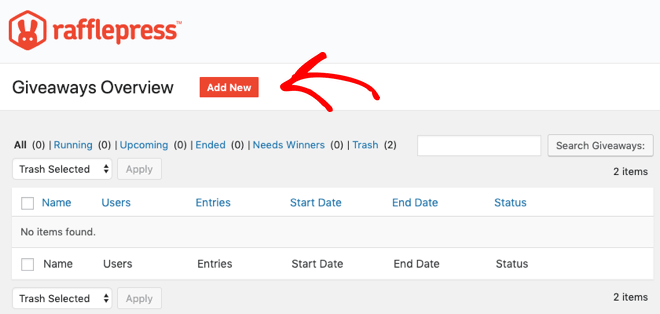
Once that’s done, you’re ready to create your first giveaway. Click Add New from the RafflePress dashboard:
Step 2: Name Your Giveaway and Choose a Template
Next, you’ll need to name your giveaway and select a template:
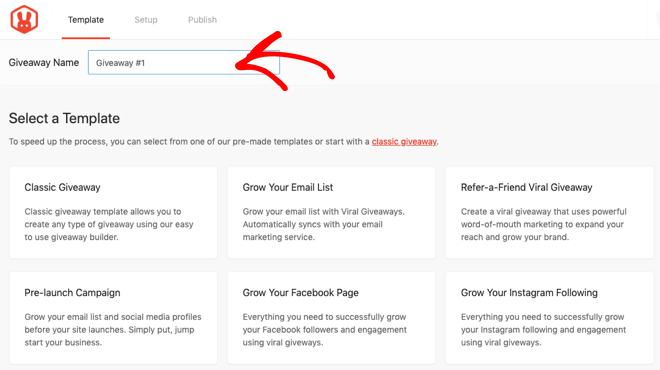
RafflePress comes with pre-made templates, including the Classic Giveaway, Grow Your Email List, Grow Your Facebook Page, and Grow Your YouTube Channel.
Select the template that best matches your goals. In this example, I’ll use the Classic Giveaway.
Step 3: Add Your Giveaway Prize Details
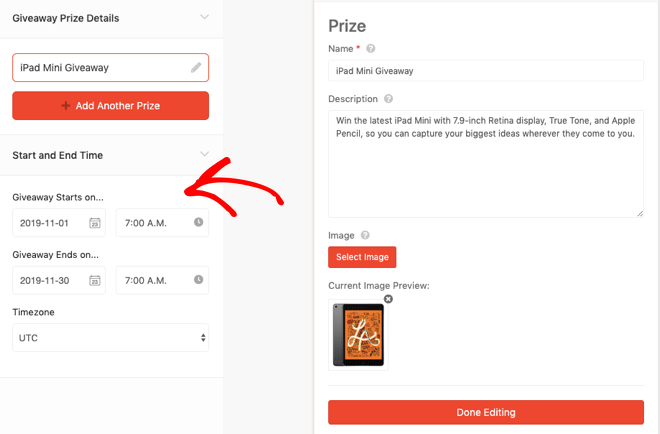
The next step is to add your giveaway prize details. On the left-hand side, click on the pencil icon. Then, on the right side, enter your prize’s name and description and add an optional image.
For example, I’ve named our prize iPad Mini Giveaway, entered a description, and added an image:
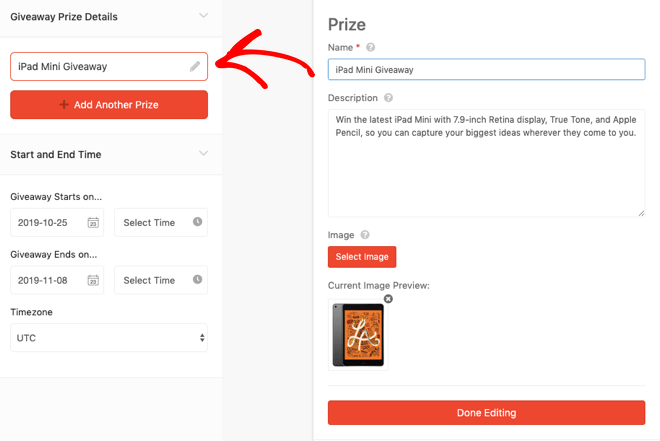
When you’ve finished entering the details, click on the Done Editing button.
If you have multiple prizes in your giveaway, you can click the + Add Another Prize button to add more.
You also need to add the Start and End Time of the giveaway on the left-hand side of the panel:
Our finished details look like this:
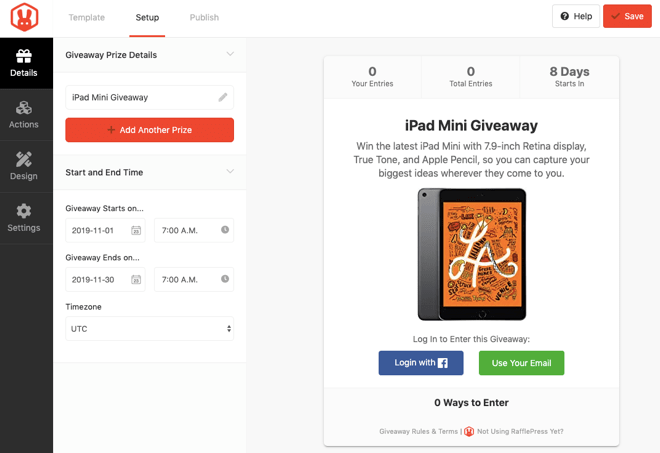
Quick Tip: Periodically, click the Save button in the top right corner to save your details.
Step 4: Choose Your Giveaway Entry Methods
RafflePress allows users to enter a giveaway multiple times by completing different actions. For example, they could have an entry for joining your email newsletter, another for following your Pinterest page, and another for following you on Twitter.
Users like multiple entries because it gives them more chances to win.
Click on the Actions tab in the left-hand menu to select how users can get entries for your giveaway. There are three main groups sorted by their goal:
- Get More Subscribers
- Get More Social Engagement
- Get More Traffic
For example, if you want more email subscribers, click on the Join an Email Newsletter action:
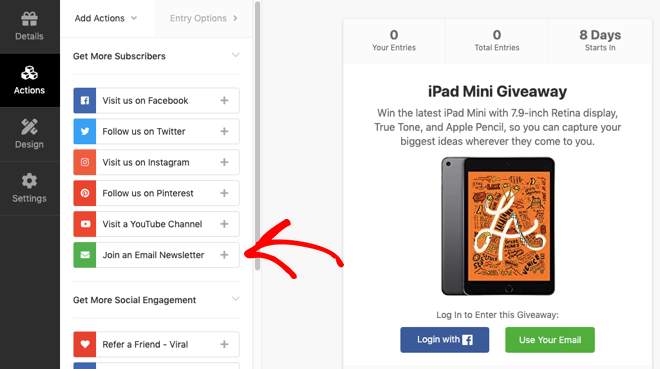
Next, you’ll have to complete the Entry Options on the next tab.
These include standard settings, such as the Title, the Value (how many entries the action will be worth), and whether the action is mandatory.
Below are some specific action settings. So, for example, for an email newsletter, you can choose your email service integration and whether you want to display an opt-in confirmation checkbox:
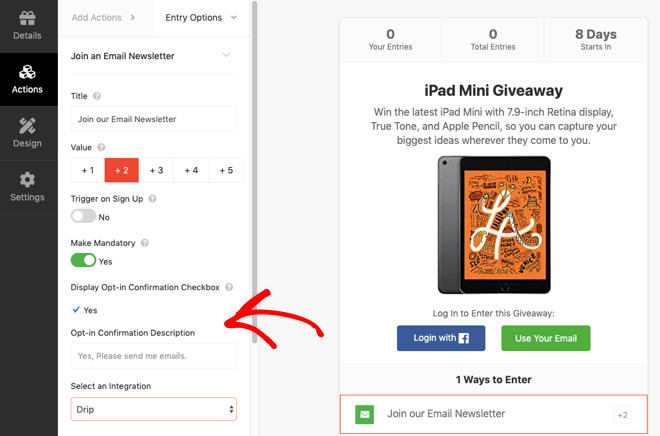
You can add as many actions as you like. The more actions you add, the more ways users can participate. Plus, it’ll help you promote the giveaway to more channels later on.
Pro Tip: Make sure that the most important actions are worth more entries and that you place them at the top of your list.
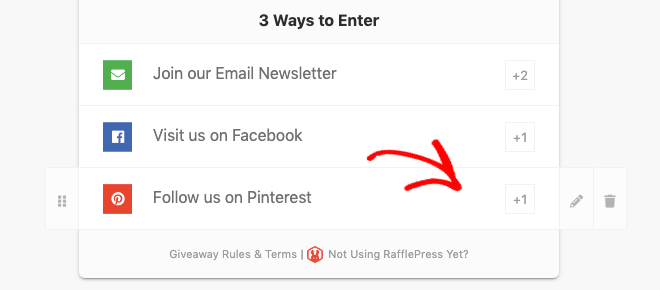
You can always rearrange actions for your giveaway by dragging and dropping on the left-hand side or delete actions by clicking the trash icon on the right-hand side:
Step 5: Design Your Giveaway
Next up, you’re going to customize the appearance of your giveaway.
Click on the Design tab in the left-hand menu and select a layout, font, and button color for your giveaway.
For example, I’ve selected:
- Layout: Image, Header, Text
- Font: Baloo with Montserrat
- Button Color: Dark red (#C0382B)
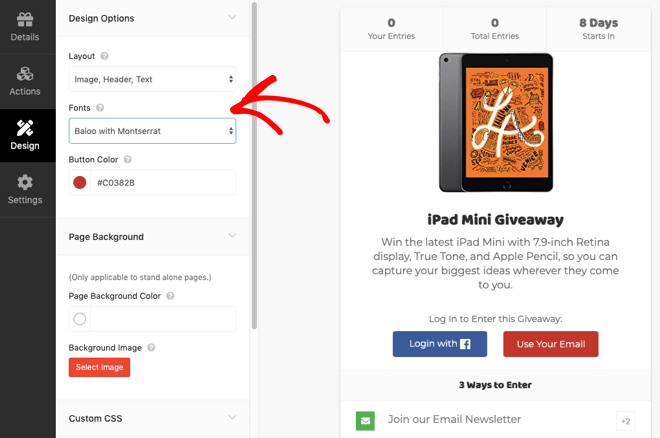
And now the design looks like this:

Note: You can also set a background color or image if you want to create a giveaway landing page (more on this later).
Step 6: Configure Your Giveaway Settings
RafflePress allows you to configure each aspect of your giveaway. You can generate rules, show and hide options, set up analytics tracking, and more.
Click on the Settings tab in the left-hand menu, and you’ll see seven sub-menus. Let’s examine each option.
General
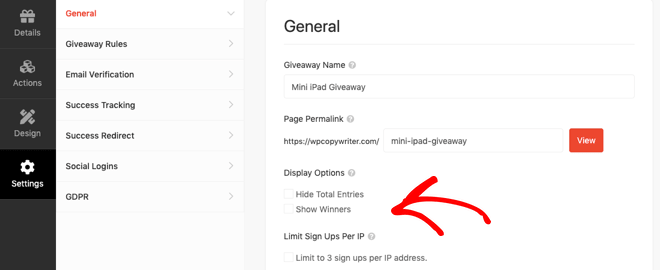
The General setting lets you configure options such as showing winners, hiding the number of entries, and limiting signups per IP address:
Giveaway Rules
The Giveaway Rules setting includes a Rules Generator to help get you started creating the giveaway rules. Click the + Generate Rules button:

You’ll see a popup window where you enter the details of your giveaway:
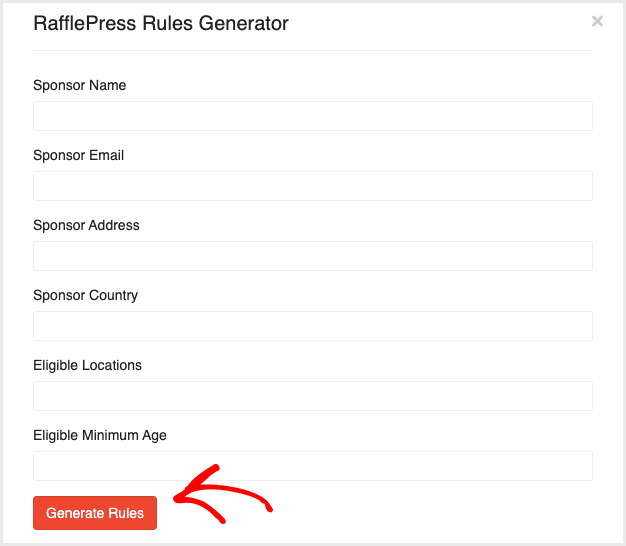
When you’ve finished, click the Generate Rules button to display your giveaway rules:
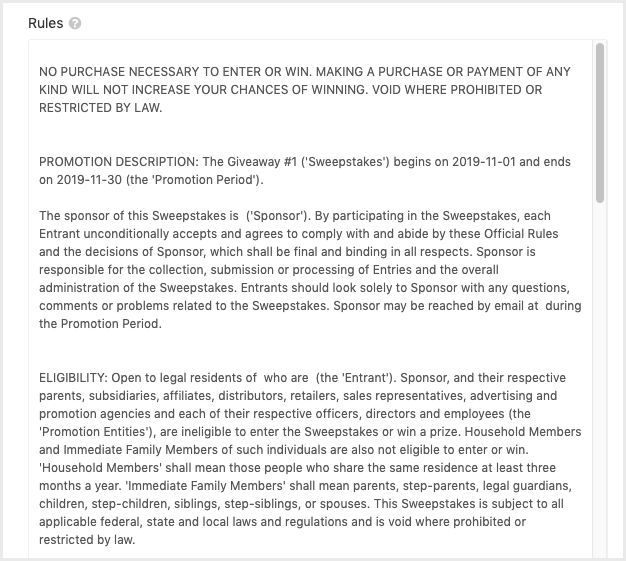
After that, you can edit the rules to ensure you’re meeting all local laws regarding giveaways and contests.
Email Verification
The Email Verification setting lets you decide if contestants must confirm their email address. When switched on, contestants receive an email with a link which allows them to confirm their identity:
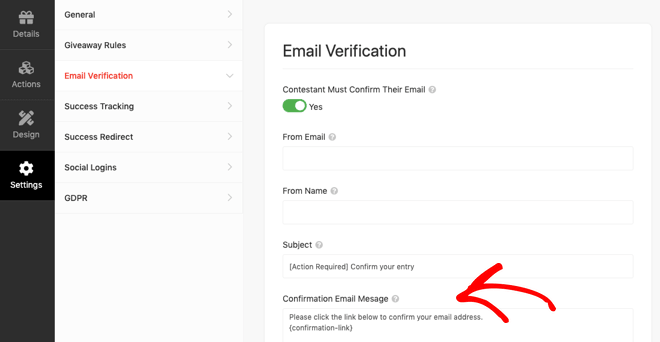
This is a smart way to ensure only valid email addresses are used.
Success Tracking
The next tab down is Success Tracking, where you can add tracking scripts:
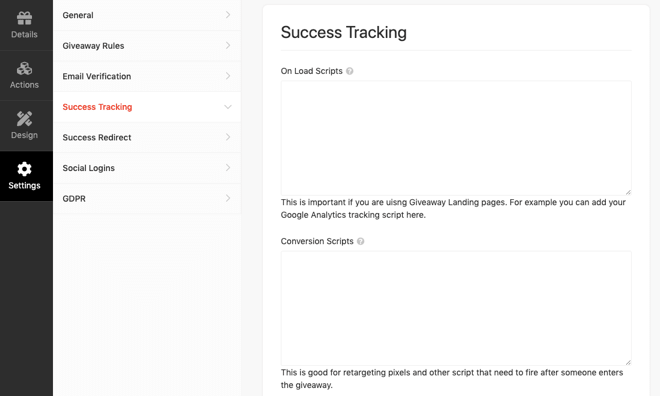
For example, you can add your Google Analytics tracking script and Facebook retargeting pixel script.
Success Redirect
The Success Redirect setting allows you to redirect contestants to a specific URL after completing all their entries:
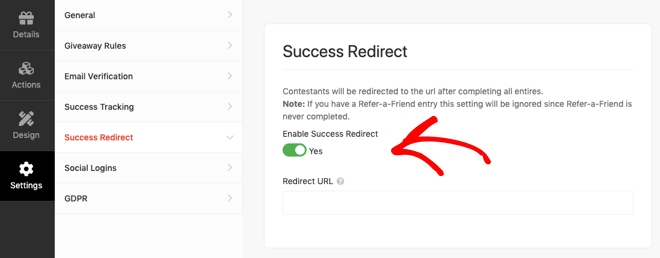
Social Logins
The Social Logins setting allows contestants to sign up for your giveaway using their Facebook account:

GDPR
The GDPR Consent setting lets you add a checkbox to the giveaway registration form that entrants must check to acknowledge their consent to the rules of the giveaway:

Quick Tip: Once you’ve finished configuring your settings, remember to click Save.
Step 7: Publish Your Giveaway
Now your giveaway is configured, it’s time to publish it on your blog.
There are 3 publishing options in RafflePress:
- RafflePress WordPress Block – embeds the giveaway in your post or page using the WordPress Gutenberg Block Editor.
- WordPress Shortcode – embeds the giveaway in the Classic Editor, Sidebar Widgets, or in your WordPress theme.
- Giveaway Landing Page – creates a distraction-free giveaway landing page on your blog.
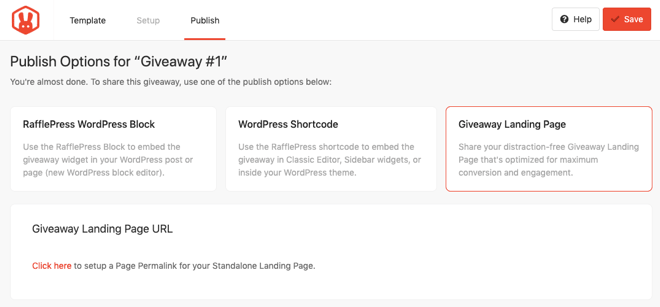
If you select the third option, you’ll go back to the General Settings page where you enter the URL for the landing page:
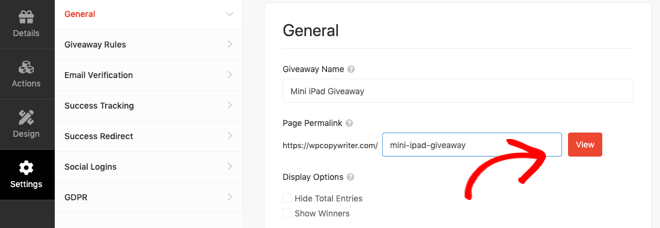
Then click the View button to see what your giveaway page looks like:

If you need to change anything, you can go back to the Design tab and make your adjustments.
Monitor, Engage, and Promote Your Giveaway To Go Viral
Now your giveaway is designed and published, it’s time to start promoting the contest before it begins.
Start by sending an email newsletter to your existing subscribers. Tell them when the giveaway starts and encourage them to spread the word to their friends. Remember to offer extra entries for referrals!
Then, start posting updates on social media platforms. Try to generate some anticipation and excitement before the giveaway begins. For example, you could use a countdown timer on your blog and social media giveaway posts.
You could also submit your giveaway to contest and sweepstakes directories.
Check out this article for more contest promotion ideas and tips to run a viral giveaway.
Pick the Winner of Your Online Giveaway
At the end of the giveaway, you’ll need to pick a winner. And RafflePress makes this easy with its built-in random winner generator.
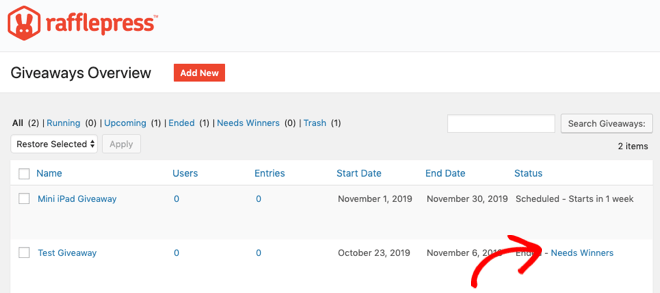
Navigate to the Giveaways Overview and click the Needs Winners link on the right:
Then click the Pick Winner button at the top of the page to pick a random winner from the list of entries:
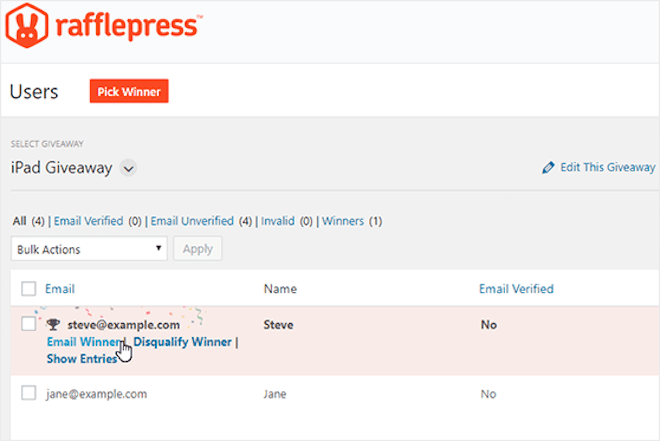
The winning entry is highlighted instantly, so all you have to do is click to email them and tell them the good news!
Announce the Winner
The final part of your giveaway is to announce the winner:
- Publish the winner on all the social media channels you used to promote the contest.
- Email all those who entered to thank them for registering and notify them of the winner.
Evaluate Your Goals
With the giveaway over, you should reflect on your goals. For example:
- Did you get more email subs? If so, have you welcomed them aboard and started nurturing them?
- How much extra traffic to your website did you get? Were there more page views across your site?
- What about your social channels? Are you getting more engagement from users?
Closing Out On How To Run a Blog Giveaway on WordPress
Now you know how easy it is to set up and run a giveaway on your blog with RafflePress, it’s time to put these steps into practice.
I want to know all about it, so let us know when your giveaway is starting. Be sure to also share your giveaway experiences and thoughts in the comments below.


Thanks for sharing this content.
Thank you, Kamal! Glad you found the post useful Let us know how your giveaway goes.
I am looking for some good blog sites for studying. I was searching over search engines and found your blog site. Well i like your high quality blog site design plus your posting abilities. Keep doing it.
Glad you found it useful!
have gone through with this article, It’s amazing!
I will keep going with your website and blogs, keep blogging as usual!
Thanks, Alice!